Tuesday, January 17, 2017

Lazy Loading and Memory Management of Images in UITableView in iOS


Introduction to Lazy Loading

What is lazy loading?
A little introduction of lazy loading is  it is a design pattern to defer the initialization of an object until the point at which it is needed. In simple words create objects when it is needed.

Problems to Tackle

Before talking about lazy loading of images, I want to mention about problems / issues associated in handling images in UITableView in iOS. These are:
  1. Scrolling is blocked / interrupted – Downloading images from server OR loading from device local storage is heavy task and it may take some time. If you load  images directly in cellForRowAtIndexPath() method of UITableView then it blocks the UI thread and your UITableView scroll will be interrupted and not smooth. You  need a mechanism to load images in a worker (separate) thread and show a place holder image until the image in not downloaded and placed in memory for fast access. Remember accessing images from Hard disk may also takes some time.
  2. App Heap Memory can overshoot – If we load many images in memory for faster access by UITableView, then memory (heap memory) allocated to the application might overshoot and app will crash with Out of Memory (OOM) error.
  3. Work with Recycling of Views can be tricky – When image is  downloaded  we need to  decide when to set a particular image in its ImageView of that row it is meant for.  It may be possible that the ImageView object will recycle and it  is given to another image and we end up showing wrong image.

Solution

Memory Locations – Space Vs Accessibility:

There are 3 locations where images are stored. Their comparison on Memory space availability and Accessibility speed is given below:
  1. Server (Memory Space is HIGH but Accessibility is SLOW)
  2. Hard Disk on Mobile (Memory Space is MEDIUM and Accessibility is MEDIUM)
  3. Heap Memory (Memory Space is LOW and Accessibility is FAST)
We need to create a balance among above 3 locations for optimum utilization of accessibility and memory space.

Mappings:

2 Mappings are required to manage the show. I have given them names. These are
  1. Bitmap Cache Map  (Unique ImageURL of Row TO Bitmap of Image)  – NSCache class provided in iOS SDK to store images in memory (Heap) will be used here. NSCache will act as cache and will also recycle the images after a certain limit is reached.
  2. Image Download Tracker (Image URL TO Object of NSOperation) – This will map the URL and the status of image that is being downloaded from the URL. It is possible that request to download the same image comes and that image is already in process of downloading. This tracker will help to ignore such requests.

Sequence of Steps:

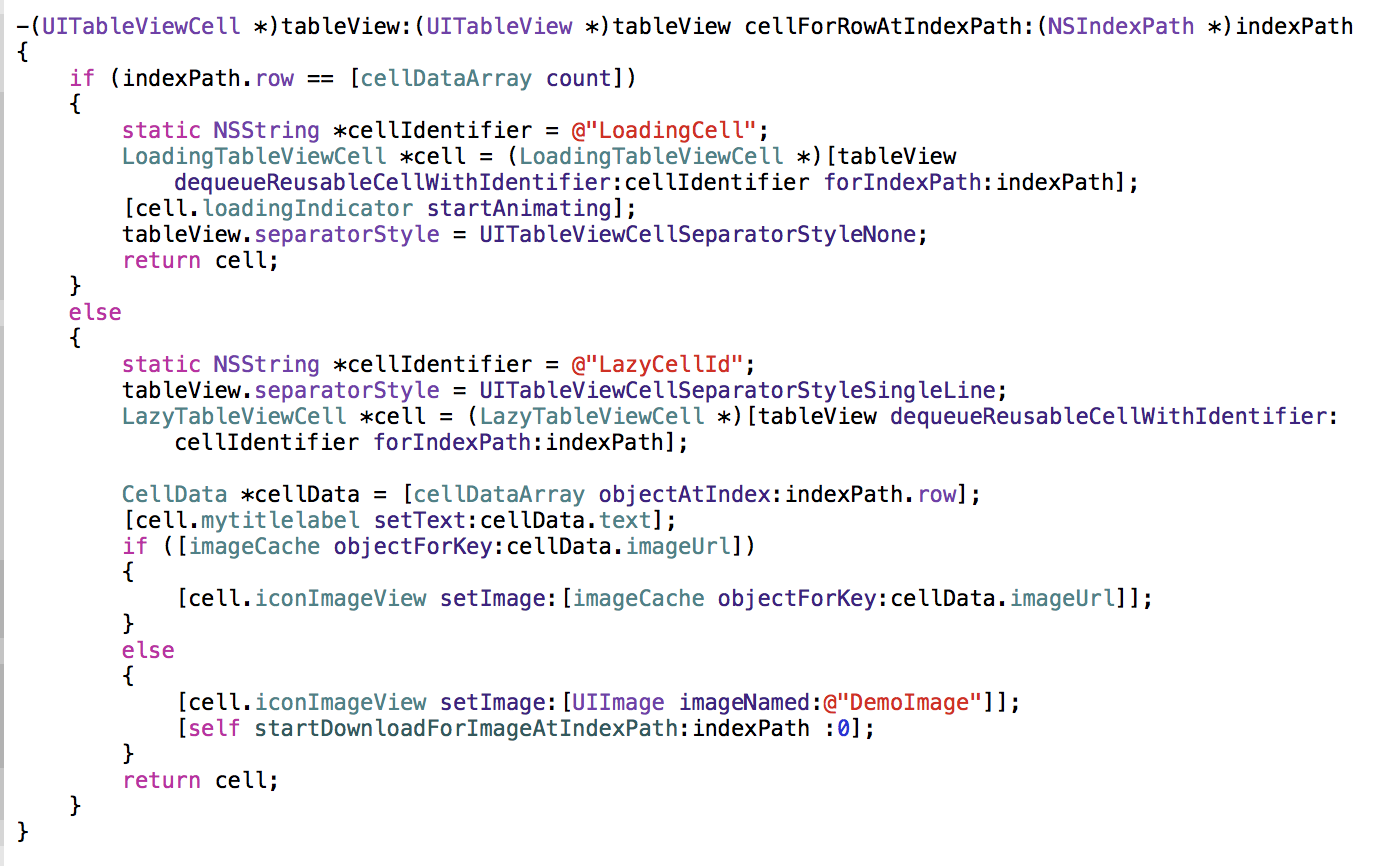
1. When user comes to UITableView the cellForRowAtIndexPath is fired for a single cell. Here we will first check that if image is available in the object of NSCache class against the key which will be the image URL. If it is there then we will get the value of UIImage and set on cell’s imageView.
2. If image is not available in object of NSCache class then in that case we will make a object of NSOperation Class and add in Queue whose task is to fetch image either from the Hard Disk or from the server.
3. When this operation will start we will first check that if image is available in local storage. If image id not present here we first download the image and then return back to the ViewController via delegate method taking object of UIImage.
4. If the image is available on device local storage Or it is available after downloading from server, it is put in Bitmap Cache  Map and send for display.
CHECKPOINT 2 of 3 – It is possible that by the time image is to be loaded from device local storage (Either already available OR after download), UITableView has been scrolled by the user and ImageView object is recycled and allocated to other row with a different ID. Mapping of ImageView and ID is checked in ImageView Recycler Map for that. If ImageView has been recycled, we don’t need to place this image in Bitmap Cache Map. But keep it on hard disk.
6. To display the image on ImageView we post a Runnable on the UI Thread using the Handler.
CHECKPOINT 3 of 3 – Just before image is set on ImageView we again check in ImageView Recycler Map if the Mapping of ImageView (IV1) and Id (ID1) exists. If the mapping exists we set the image on ImageView else the place  holder (default) image is set.

Friday, January 13, 2017

Too many emails from Confluence?

"I have a rule set up so that all emails from Confluence go strait to the trash."
- Confluence user
"I have 60 unread emails, and most of them are from Confluence."
- Confluence user
"Come on! More emails!?"
- Confluence user

Does this sound like you?  You're not alone, by default Confluence is way too email happy.  The good news is that it doesn't have to stay that way, in this post I'll outline a couple ways you can reduce the clutter.

Changes we've made to Confluence to reduce number of emails

You may have noticed the "Notify watchers" checkbox near the save button when editing a page.  It is checked by default and it's the source of a lot of unnecessary emails.  Likely nobody cares that you've added a comma or removed some formatting.  
To solve this we've installed the NoEmailStorm plugin that gets rid of the checkbox all-together, replacing it with a 'save and notify' button.  Now it's a conscious decision to send out the notification, not the other way around.
Old save page options
New save page options

Changes you can make to reduce number of emails

The most useful emails I get from Confluence are when somebody @mentions me in a page.  The least useful emails I get are from minor edits being done to a page I'm watching, these are the one's we'll focus on reducing.  Here are some tips:

Use the 'Watch' button to toggle watching of pages and spaces

You only get notifications for pages you're watching.   Every page has a "Watch" button where you can toggle your watch for that page and the current space.

Turn off auto-watch and adjust other email settings

When you create, edit or comment on a page you automatically start watching that page.  You can turn off this auto-watch feature in your settings.

Manage what you're currently watching

To see a list of pages and spaces you're currently watching (and stop watching those you're no longer interested in) go to your settings

Secure Coding Best Practices

Secure Coding Best Practices has been an area of emphasis for our department this year.  World Class Security will be one of Information Systems’ Key Initiatives for 2016.  One of the reasons we need to take this seriously is that more than 90% of all attacks to company systems are coming through the web application layer (source:  https://www.securestate.com/services/web-application-security-grey-box).
Every three years OWASP (Open Web Application Security Project) comes out with a list of the Top Ten most critical web application security risks.  As developers we need to be familiar with these risks.  There are actually 695 different web application vulnerabilities, but safeguards against the top 10 are usually effective against most of the others. 

Here is a list of some Secure Coding Best Practices –
  1. Input Validation
    • Whitelisting
    • Blacklisting
  2. HTML encoding / escaping.
  3. Use Parameterized Queries.
    • Prepared Statements
  4. Use CSRF Tokens.
  5. Protect your session with HTTPS.
  6. Encrypt sensitive data.
    • At rest
    • In transit
    • Salt and hash all passwords
  7. Always check for proper access rights
    • Data
    • Function calls
  8. Do not expose primary keys and IDs.
  9. Classify your data. 
    • Know your asset.  What are you trying to protect?
  10. Secure your framework. 
    • Best way to secure your application. 
    • Makes security easy for the developers.
  11. Use standard tools and code libraries.
    • Update them regularly
  12. Error handling
    • Fail securely
  13. Avoid security by obscurity.
    • There are many ways to find what seems to be hidden.
  14. Defense in depth.
    • Least privilege
    • Event logging
    • Prevention and detection
  15. Know the attack surface of your application.
  16. Implement security throughout the SDLC
  17. Involve your IT Security team early.
  18. Perform Vulnerability Assessments (VA).
  19. Harden your server
    • Close unused services
    • Patch your application server
    • Don’t forget your development environment
  20. Trust no one!
    • Don’t trust the infrastructure
    • Don’t trust services from external systems
    • Don’t trust users’ input

TypeScript to replace AtScript for Angular Development, Angular Team Announces at ng-conf 2015

TypeScript is the New AtScript

This morning in the keynote address at the ng-conf, Brad Green, the AngularJS Framework Manager at Google, announced that TypeScript with it's latest release encompassing ES6 and annotations, will be the language that AngularJS is developed in. Since the TypeScript team at Microsoft has been working with the AtScript team at Google to collaborate on the efforts of these two languages, the TypeScript effort has been directed at closing the gaps between the two languages. Apparently that gap has been completely closed as the Angular Team leadership has announced that the two have basically merged, and there is now one language, TypeScript. Of the two open source languages, TypeScript was the more mature and had superior IDE support. TypeScript is due to release version 1.5, which is set to implement remaining ECMAScript 6 features and annotations. According to the TypeScript team's MSDN blog a beta version of TypeScript 1.5 will be released in the "coming weeks" with support for additional development environments and styles.

Design Patterns - Strategy

What's this all about?

One of my unofficial goals this year is to gain a better understanding of software design patterns, how to use them in my projects, and when it's appropriate to do so. Since I believe that we learn more when we share what we learn, I hope to periodically post a short article on a design pattern that I am either learning or reading about, or that I feel I have experience with. I will seek to make these articles brief and to the point so that they could be used as a quick reference for anyone wanting to learn about a given pattern. I encourage you to make comments and provide insight where I may not have.
wizard2.gif
To be fair to you the reader, I am not yet a wizard level software engineer with decades of insight and war stories from coding in the trenches. I am, however, passionate about my craft and eager to take a journey with you on the path to enlightenment. I think this is all the fluff you the reader can handle for now, so I will move to the topic at hand. 

A common problem

Imagine that you are developing a new and completely original game, titled "Knights vs Dragons". In this medieval game you want the player to be able to unlock different types of knights as he or she progresses through the various levels and earns experience. A new player, having no experience, will start off the game with access to only one character, the Basic Knight. 

Level 1

Basic Knight

The Basic Knight has one weapon, a wooden sword meant for vanquishing straw stuffed foes while our player learns the ropes in the tutorial. Figuring that you know a lot about Knights you decide to give the Basic Knight the following behaviors:


demo
Great, this knight does everything you want him to do and doesn't complain. He can walk, talk, fight, and display. The display() method is for rendering the Knight on the screen. It is really only included as a visual placeholder for methods that won't be a part of our Strategy pattern, although you certainly could use a DisplayStrategy. 

Level 2

Dagger Wielding Knight

knight7.gif
The Dagger Wielding Knight has a dagger for his weapon, which is certainly an improvement over the the Basic Knight. This, however, presents a problem: the Dagger Wielding Knight will need to know how to fight differently from the Basic Knight but will still walk and talk the same. Remembering from a college course you took on Object Oriented Design, you should isolate what changes from what stays the same. So you decide to simply abstract the common knight behavior into an AbstractKnight class. That way each class that extends from the Abstract class can choose what behavior to override and what to reuse.


Using inheritance
Great! Both Knights appear to have their own unique fighting style and there is no duplication of any code because both knights have reused what they have in common via the Abstract Knight.

Level 3, 4, 5, 6, 7

In levels 3-7 we introduce the following five knights to the roster:
Level 1: Basic Knight
Level 2: Dagger Wielding Knight
Level 3: Sword Wielding Knight
Level 4: Cowardly Knight
Level 5: Royal Knight
Level 6: Brave Knight
Level 7: Diplomatic Knight
knight7.gifknight3.gifknight.gifknight5.gifknight2.gif
Fighting Technique: DOESN'T REALLY FIGHTFighting TechniqueLUNGE, PARRY, SWISH!Fighting TechniqueLUNGE, PARRY, SWISH!Fighting TechniqueDOESN'T REALLY FIGHTFighting TechniqueLUNGE, PARRY, SWISH!Fighting TechniqueLUNGE, PARRY, SWISH!Fighting TechniqueDOESN'T REALLY FIGHT
Brimming from your recent success with the Basic Knight and the Dagger Wielding Knight you confidently create five more Knights that inherit from Abstract Knight when you realize that you are duplicating code everywhere . You already accounted for code duplication with the addition of inheritance so what happened?
It turns out that you still have not isolated the things that change from the things that stay the same. What changes other than the knight? Answer: the fighting technique.

The Strategy Pattern

Defines a family of algorithms, encapsulates each one, and makes them interchangeable. Strategy lets the algorithm vary independently from clients that use it.
-Design Patterns: Elements of Reusable Object Orientated Software
The Strategy Pattern is made up of three parts:
  • A Strategy: An interface that allows access to an algorithm.
  • A Concrete Strategy: Implements a particular algorithm to conform to the Strategy interface. 
  • A Context: Uses the algorithm through the Strategy interface.


Strategy Pattern - Conceptual

The Strategy Pattern works by moving a group of related behaviors out of the context that calls on them and into their own group behind a common interface. The context can then refer to the interface and never be concerned with the implementation. Lets see how this fits in with the Knights vs Dragons game being built.


Strategy Pattern - Applied

Summary

Using the Strategy Pattern has resulted in a design that concentrates the fighting behavior/algorithms into their own specific classes (Strategies). Another benefit is that it is simple to add new Strategies as the game requirements change. It is also now possible to reuse each Fight Strategy and hot swap them at run time. Maybe the Cowardly Knight regains his courage?

Pros

  • Can be better than traditional sub-classing because you implement a simple interface as opposed to overriding methods from a inherited parent class for every desired behavior.
  • Removes, from a context class, those implementation details that the context class either doesn't need to know, or in some cases should not know.
  • Easy to extend, adding new concrete strategies.
  • Adheres to best practice principles such as DRY and SRP.

Cons

  • There are more objects created than in a traditional inheritance based solution.
  • Some parameters on Strategy interface may be used in every case by every concrete strategy. 

Sources


  • Resources
    • Gamma, Helm, Johnson, and Vlissides. Design Patterns: Elements of Reusable Object Orientated Software (Gang of Four). Reading, Mass.: Addison Wesley Longman, 1998. Print.
    • Holub, Allen I. Holub on Patterns: Learning Design Patterns by Looking at Code. Print.
    • Freeman, Eric, and Elisabeth Freeman. Head First Design Patterns. Sebastopol, CA: O'Reilly Media, 2005. Print.
    • Geary, David. "Strategy for Success." 22 Apr. 2002. Web. <http://www.javaworld.com/article/2074195/swing-gui-programming/strategy-for-success.html>.
  • Images

Android Setup of Sencha Cross Platform Application

Step 1: Install/Verify you have Java

              a. Run “java –version” on the command line.
              b. If the java –version doesn’t work then download the Java SDK (JDK and JRE) from
                   http://www.oracle.com/technetwork/java/javase/downloads/index.html
              c. Install the SDK.
              d. Set the environment variable JAVA_HOME = “C:\Program Files\Java\jdk1.8.0_91” (example).
              e. Add “%JAVA_HOME%\bin” to your “path” variable.
               f. Run java –version again which should now give you the Java Version.

Step 2: Install/Verify Android SDK platform

               a. Run “android list platform” in the command line.
               b. If you get something as “unrecognized” then you probably don’t have android SDK installed or you don’t have the “android sdk” not set in “environment variable”.
                c. Installing “Android SDK”
                Install “installer_r24.4.1-windows.exe” from https://developer.android.com/studio/index.html
                Set “ANDROID_HOME” variable in System Variables to
                C:\Softwares\Android\android-sdk (example).
                Set these paths in the “path variable”: C:\Users\svegiraj\AppData\Local\Android\sdk\platform-tools\;C:\Users\svegiraj\AppData\Local\Android\sdk\tools\ (example).
                 Also set “path variable” to “%ANDROID_HOME%\tools” (example).
                d. Now run “android list platforms” again. It should run.
                e. Install “android-22”, “HAX-Machine” for emulator and “Atom Processor”. These are mandatory and others might include depending on the requirement.
                f. If you want to run the emulator using proxy then you might have to run the following command
 “emulator –avd {emulator name} –http-proxy http://username:password@proxy.ihc.com:8080”.
Step 3: Do a sencha app build native
              a. There might be some proxy issues if you’re doing the build using the organization network. You might want to use a personal hotspot.
              b. There might some problems which might occur during this build.
1. Connection Refused:  This happens due to the proxy issues which will get resolved if you connect to a personal hotspot.
2. You will also need to install a whitelist plugin and once you do that the build might throw up an error like error in “url.” In the InAppBrowser plugin.
3. This is because the InAppBrowser plugin being used is of Old Version. You will have to remove the old InAppBrowser plugin and install the latest version.
4. You will also need to comment the push plugin and inappbrowser plugin url in the hookscripts folder of ihclib and cordova so that you don’t again install the same version or plugin.
5. And now when you do the sencha app build native it should run.

Step 4: You might need to change the URL in the BASE_URL in APPSETTINGS and give an ip address in the place of lpvecisdev203 as it might not connect to the specified url.

Step 5: Do a Sencha app build native again and then cordova emulate android to run the app on the emulator.

The above steps will help you get the Android application running.
Major errors once the Android Build gets ready
There was this Cookie issue we were facing Android. The cookie which we set was not going in the actual network but it was being replaced by some other one.
If you have one, you can clearly know that by printing the oAuth2Cookie you are actually sending in the Sencha Architect and seeing the actually cookie that is going in the Google or Safari’s developers console (Network tab).
 To resolve the issue you need to use Cookie Master.
Steps to use Cookie Master:
Step 1: Make sure you have the Cookie Master Plugin.
Step 2: In the place where you are setting the cookie you need to do the following:
  
1)      Let’s say this is your cookie :

AMWEBJCT!%2Fmga!JSESSIONID=00005GDpg7X6Ny4YhuUThzjSDQ9:b694bcfd-98c5-4b24-9875-a856ae40265a; Path=/; PD_STATEFUL_0c2a40bc-7a67-11e4-aa54-0050569d7a73=%2Fmga; Path=/; PD-S-SESSION-ID=1_2_1_YGjdoJ0XHo1YZAbotK-GDPyX4pX0NXNLFHlnma+05+a4TcQ+; Path=/; Secure
Step 1: Split the cookie into array using the “;” as a separator.
Step 2: Let’s say you get cookieArr from the above split.
Step 3: Again split the cookieArr using the “=” as a separator.
Step 4: You will get a cookieArrPair where you will have the key and value pair.
Step 5: Set the above in the cookie master as

                cookieMaster.setCookieValue(searchUrl, cookieArrPair[0], cookieArrPair[1]);
                cookieMaster.setCookieValue(searchUrl, cookieArrPair[4], cookieArrPair[5]);
                cookieMaster.setCookieValue(searchUrl, cookieArrPair[8], cookieArrPair[9]);
               searchUrl -> domain
               cookieArrPair[0] -> Key (J_Session or P_Session or P_Stateful)
               cookieArrPair[1] -> Value
Step 3: After this code, don’t set the cookie any more in the store. Comment that out.
Step 4: The above sub-steps may help you solve the cookie problem
Step 5: But, according to our tests this code doesn’t work for iOS. In the iOS you just need to set the cookie directly in the store.