Kasinathan Technology - Blog
Wednesday, September 5, 2018
Tuesday, September 4, 2018
Tuesday, August 28, 2018
Wednesday, August 15, 2018
Monday, August 13, 2018
Tuesday, July 31, 2018
Migrating Your Objective-C Project to Swift
Migration provides an opportunity to revisit an existing Objective-C app and improve its architecture, logic, and performance by replacing pieces of it in with Swift. Apple has provided interoperability between Objective-C and Swift, so you won’t need to migrate everything at once. You’ll be using Swiftify (in particular, the Swiftify Xcode & Finder Extension) for a straightforward, incremental migration of an app.
Swiftify simplifies the process of translating the syntax from Objective-C to Swift. Interoperability makes it possible to integrate the converted code back into the Objective-C project without any hassle. This means that you can use Swiftify to explore Swift’s extensive functionality one piece at a time, and then integrate it back into your Objective-C project without having to rewrite the entire app in Swift at once.
Update: Swiftify’s new Advanced Project Converter streamlines the process of Objective-C to Swift code conversion. If you’re part of the Swiftify Unlimitedplan, give it a try!
Preparing Your Objective-C Code for Migration
Before converting Objective-C to Swift, it’s best to start off with the most modern Objective-C code possible. Xcode provides a modern Objective-C converter that can assist you during the modernization process.
Xcode’s modern Objective-C converter can help with the following:
- Changing
idtoinstancetypewhere appropriate - Using the correct enum macros
- Updating to the more modern
@propertysyntax
Although the converter helps with the mechanics of identifying and applying potential modernizations, it doesn’t interpret the semantics of your code. For example, it won’t detect that your
-toggle method is an action that affects your object’s state, and it will erroneously offer to modernize this action to make it a property. Make sure to manually review and confirm any changes the converter offers to make to your code.
To use the modern Objective-C converter, choose Edit → Refactor → Convert to Modern Objective-C Syntax.
The Migration Process
The most effective approach for migrating code to Swift is on a per-file basis — that is, one class at a time. Because you can’t subclass Swift classes in Objective-C, it’s best to choose a class in your app that doesn’t have any subclasses. You’ll replace the .m and .h files for that class with a single .swiftfile. Everything from your interface and implementation goes directly into this single Swift file. You won’t create a header file. Xcode generates a header automatically in case you need to reference it.
Creating a Bridging Header File
When adding your first .swift file to the project, you’ll likely be hit with a prompt that looks like this:
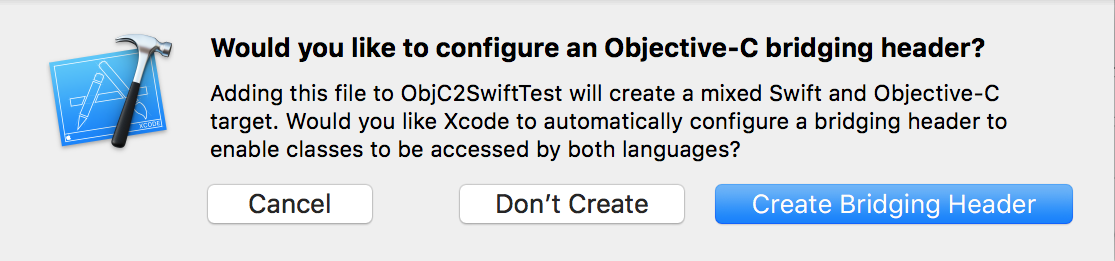
Click Create Bridging Header.
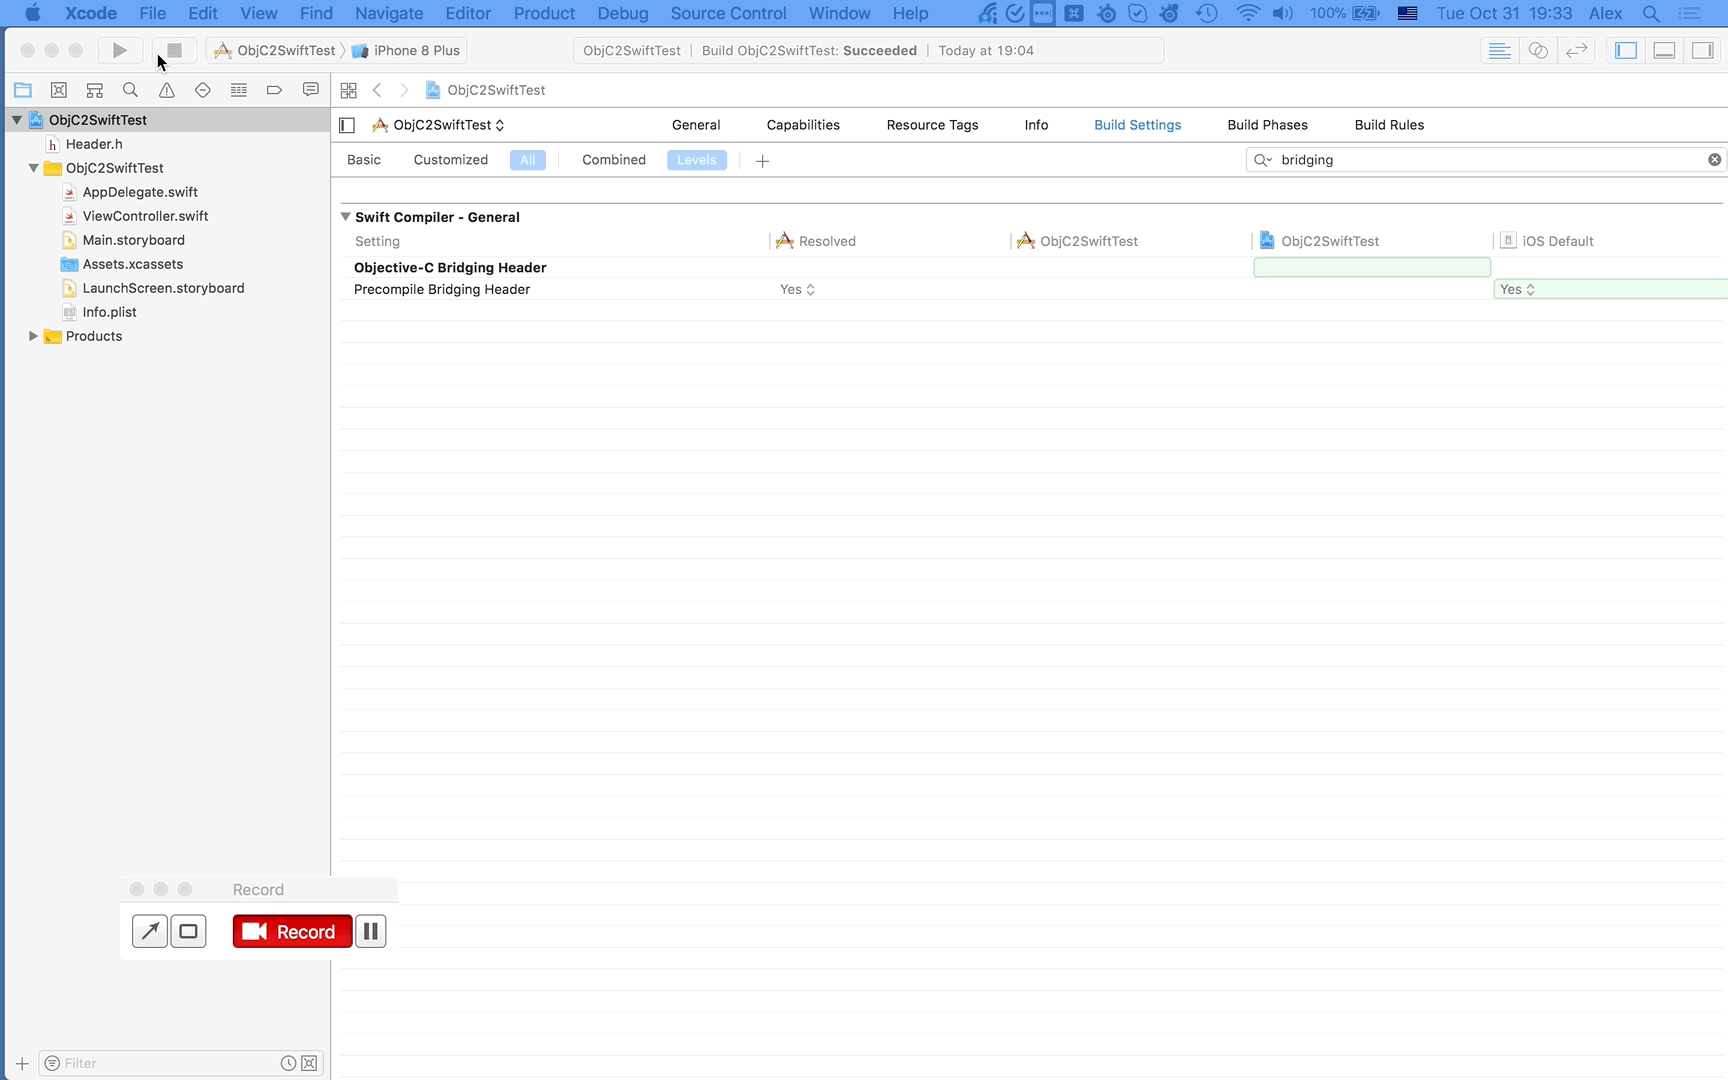
If you did not see the prompt, or accidentally deleted your bridging header, add a new .h file to your project and name it [MyProject]-Bridging-Header.h, then make sure you link its path in your target’s project settings like so:
Do I need to convert the entire project?
Don’t feel obligated to convert all your code to Swift. There may be pieces of code that you want to leave in Objective-C, and there’s nothing wrong with that.
For more information, please take a look at our post, Should I Convert Everything to Swift?.
A step-by-step approach
- Pick a pair of .h and .m files to be converted into Swift (i.e. MyViewController.h and MyViewController.m). If your goal is to convert the entire project to Swift, leave the AppDelegate class for last.
- Search for
#import “MyViewController.h”through your whole project - Remove
#import “MyViewController.h”from the Obj-C Bridging Header File ([MyProject]-Bridging-Header.h). - In all .m files: Replace instances of
#import “MyViewController.h“with#import “[MyProject]-Swift.h“to import your Swift umbrella header instead. - In all .h files: Replace
#import “MyViewController.h“with a forward class declaration:@class MyViewController. This helps to avoid circular references between header files. - Convert the pair of Objective-C files to Swift. The Finder extension included in Swiftify for Xcode is the easiest way to do that. Alternatively, copy contents of both .h and .m files to a .swift file and use the “Convert File to Swift” command in the Swiftify Xcode Extension.
- Remove .h and .m files from the project, and add the converted .swift file instead.
- Try to compile the project, and fix any conversion errors. Many issues can be fixed by following Xcode auto-fix suggestions. The Editor → Fix All in Scope command is especially helpful here. If you see any error that occurs a lot to your project, feel free to report the issue to Swiftify.
- Build and run the project. If the runtime complains that it can’t find this class (this is usually accompanied by crashing), find all references to it in the Storyboard (or XIB) editor and reenter the class name in the Identity Inspector. Save and try again.
If you’re converting the entire project
When all of the other files have been converted, convert the AppDelegate class. At this point, if there are no Objective-C files left in the target, you can delete the main.m file and the .pch (precompiled header) file.
How has your experience been moving to Swift?
Is there any part of the conversion that you found difficult?
Related articles
Related articles
The following articles may be very helpful for your project migration:
https://developer.apple.com/library/content/documentation/Swift/Conceptual/BuildingCocoaApps/Migration.html
https://developer.apple.com/library/content/documentation/Swift/Conceptual/BuildingCocoaApps/Migration.html
https://www.oreilly.com/ideas/translating-your-objective-c-project-to-swifthttps://www.slideshare.net/DominiqueStranz/migrating-from-objectivec-to-swift-74054759
Additionally, here is a very good description for using the Bridging Header filefor interoperability between Objective-C and Swift code.
Monday, July 16, 2018
How to Uninstall Node.js from Mac OSX
Just keep in mind that these commands will remove the Node executable, and not necessarily all of the Node projects or NPM cache.
Manually
If you installed Node either by source or from a binary distribution then you'll likely have to delete the executable and other resources manually. Unfortunately, this isn't easy since there are quite a few directories containing Node resources, like
npm and node_modules.
To completely uninstall the
node executable as well as npm, here are some instructions on what to do:
Note that not all of the directories listed here may exist on your system depending on your install method.
- Delete
nodeand/ornode_modulesfrom/usr/local/lib - Delete
nodeand/ornode_modulesfrom/usr/local/include - Delete
node,node-debug, andnode-gypfrom/usr/local/bin - Delete
.npmrcfrom your home directory (these are your npm settings, don't delete this if you plan on re-installing Node right away) - Delete
.npmfrom your home directory - Delete
.node-gypfrom your home directory - Delete
.node_repl_historyfrom your home directory - Delete
node*from/usr/local/share/man/man1/ - Delete
npm*from/usr/local/share/man/man1/ - Delete
node.dfrom/usr/local/lib/dtrace/ - Delete
nodefrom/opt/local/bin/ - Delete
nodefrom/opt/local/include/ - Delete
node_modulesfrom/opt/local/lib/ - Delete
nodefrom/usr/local/share/doc/ - Delete
node.stpfrom/usr/local/share/systemtap/tapset/
This list should include just about all the references to Node on your system. Keep in mind there may be more. Please let me know if you find any others (and how you installed Node originally)!
Homebrew
The Homebrew method is arguably one of the easiest ways to get Node on and off your system. The command to remove it is just as simple as the command to install it. Assuming you used
brew install node to install it, just execute this to get rid of it:$ brew uninstall node
And that's it! All traces of the executable will be gone from your system.
NVM
The Node Version Manager (NVM) is almost as convenient as Homebrew, but in a different way. It allows you to install multiple versions of Node on your system so you can easily switch from one to the other.
Eventually, you'll probably want to get rid of one of the versions when you're done with it. And like Homebrew, you can easily do this using a command similar to the way you installed it:
$ nvm uninstall <version>
And a complete example of this might be something like:
$ nvm uninstall v0.12.2
And now only version v0.12.2 of Node will be uninstalled. Keep in mind that if you had multiple versions installed, then Node will still be on your system, but not v0.12.2 (using the example above).
Phantom Installs
If for some reason none of the above methods worked for you, then you can always hunt down the executable using the command line tool
which. This command shows you the location of the file for a given command.
We can use this to find where Node is installed on your system. You can try this with:
$ which node
/Users/Kasinathantechnology/.nvm/versions/node/v4.1.2/bin/node
You can see in the output that my
node command is linked to an NVM version, although yours may be located somewhere else. Now I can use this info to uninstall it.
Using this tool should help you find out how the executable was installed or how to remove it manually.
Wednesday, March 28, 2018
How to completely uninstall Android Studio?
Execute these commands from the terminal
rm -Rf /Applications/Android\ Studio.app
rm -Rf ~/Library/Preferences/AndroidStudio*
rm -Rf ~/Library/Preferences/com.google.android.*
rm -Rf ~/Library/Preferences/com.android.*
rm -Rf ~/Library/Application\ Support/AndroidStudio*
rm -Rf ~/Library/Logs/AndroidStudio*
rm -Rf ~/Library/Caches/AndroidStudio*
rm -Rf ~/.AndroidStudio*
if you would like to delete all projects:
rm -Rf ~/AndroidStudioProjects
to remove gradle related files (caches & wrapper)
rm -Rf ~/.gradle
use the below command to delete all Android Virtual Devices(AVDs) and *.keystore. note: this folder is used by others Android IDE as well, so if you still using other IDE you may not want to delete this folder)
rm -Rf ~/.android
to delete Android SDK tools
rm -Rf ~/Library/Android*
Wednesday, March 21, 2018
Format an External Hard Drive or USB Flash Drive for Mac OS X
How to Format an External Drive for Mac Compatibility
This is a simple procedure and is achieved the same way for all drive types and through all connections, be they USB, Firewire, or Thunderbolt. Formatting a drive will erase all data and partitions on the disk:
- Connect the hard drive or USB key to the Mac
- Launch Disk Utility, located in Applications > Utilities
- Locate the drive name from the left hand side of Disk Utility and click on it
- Click on the “Erase” tab across the top
- Next to “Format:” click the contextual menu and select “Mac OS Extended (Journaled)”
- Name the drive if you want, the name can be changed at any point
- Click the “Erase” button and confirm again on the next pop-up window


That’s all there is to it, the drive will now format and erase everything on it.
Smaller external hard drives, SSD’s, and USB flash keys format quickly, while a larger hard drive may take a while longer. When completed, the drive will be formatted to the Mac OS X compatible HFS+ filesystem.
The videos below demonstrate the complete process of formatting an external hard drive for full Mac OS X compatibility, this uses the new Disk Utility in modern versions of OS X:
Similarly, you can perform the same type of process in OS X for making a USB flash drive compatible with Mac OS using the Disk Utility in OS X, as you can see, it’s a quick procedure that is done in short order on any Mac:
Should you intend to make an OS X installer drive or create any other bootable Mac OS X volume from a drive, or use a new drive as a fully compatible Time Machine backup drive, you will also need to complete this process.
Wednesday, March 7, 2018
R Language
R is a language and environment for statistical computing and graphics . R provides a wide variety of statistical (linear and nonlinear modelling, classical statistical tests, time-series analysis, classification, clustering, …) and graphical techniques, and is highly extensible.
One of R’s strengths is the ease with which well-designed publication-quality plots can be produced, including mathematical symbols and formulae where needed. Great care has been taken over the defaults for the minor design choices in graphics, but the user retains full control .
R Statistics examples are:
1) Mean,Median & Mode
2) Linear Regression
3) Multiple Regression
4) Logistic Regression
5) Normal or Binomial Distribution
6) Poisson Regression
7)Analysis of Covariance
8)Time Series Analysis
9) Decision Tree
10) Random Forest
- an effective data handling and storage facility,
- a suite of operators for calculations on arrays, in particular matrices,
- a large, coherent, integrated collection of intermediate tools for data analysis,
- graphical facilities for data analysis and display either on-screen or on hardcopy, and
- a well-developed, simple and effective programming language which includes conditionals, loops, user-defined recursive functions and input and output facilities.
R Statistics examples are:
1) Mean,Median & Mode
2) Linear Regression
3) Multiple Regression
4) Logistic Regression
5) Normal or Binomial Distribution
6) Poisson Regression
7)Analysis of Covariance
8)Time Series Analysis
9) Decision Tree
10) Random Forest
R is an integrated suite of software facilities for data manipulation, calculation and graphical display. It includes
The term “environment” is intended to characterize it as a fully planned and coherent system, rather than an incremental accretion of very specific and inflexible tools, as is frequently the case with other data analysis software.
R, like S, is designed around a true computer language, and it allows users to add additional functionality by defining new functions. Much of the system is itself written in the R dialect of S, which makes it easy for users to follow the algorithmic choices made. For computationally-intensive tasks, C, C++ and Fortran code can be linked and called at run time. Advanced users can write C code to manipulate R objects directly.
Tuesday, March 6, 2018
Error:Unable to resolve dependency for ':@debugUnitTest/compileClasspath' ':@debugUnitTest/compileClasspath': Could not resolve project :CordovaLib.">
Error:Unable to resolve dependency for ':@debugUnitTest/compileClasspath': Could not resolve project :CordovaLib.':@debugUnitTest/compileClasspath': Could not resolve project :CordovaLib.">
I commented the lines below in the build.gradle file:
//debugCompile project(path: 'CordovaLib', configuration: 'debug')

//releaseCompile project(path: 'CordovaLib', configuration: 'release')
and added:
compile project(':CordovaLib')
This worked for me.
Monday, March 5, 2018
Install Or Reinstall All Cordova Plugins In Package.json With Ionic
When installing the dependencies of an existing app your need to install all of the cordova plugins listed in package.json. Or you may just want to ensure they are all installed properly.
Check out the following ionic commands:
# Only install all plugins
ionic state restore --plugins
# or
cordova state restore --plugins

# Only remove all installed plugins
ionic state clear -- plugins

# Remove all then Install all plugins in package.json
ionic state reset -- plugins
Friday, March 2, 2018
ADDING AN IOS HOME SCREEN ICON FOR YOUR WEBSITE
On iOS devices using the Safari browser, you are able to add a shortcut to your home screen to any site online. By default, these shortcuts will display as a screenshot of the website. This article will explain how to set an icon to your website so that when it is saved onto iOS home screens this will display instead.

Creating And Uploading Your Icon
The image for the shortcut must be 150x150 pixels in size. This will allow it to used across all iOS devices - those with regular displays and retina displays too!
Additionally, in order for the icon to work correctly, it must follow the following specifications:
- Must be saved in .png format
- Must be titled apple-touch-icon
Once you have created your icon, you can then upload it into the files area within your Create account (not the images area).

To upload the icon:
- Log into your Create account
- Click 'Content' from the top menu
- Click 'Files' from the left-hand menu
- Click the 'Add File' button
- Follow the steps to upload your image
Adding The Icon To Your Site
Once you've uploaded the icon, you will need to add a small piece of code to the Custom <HEAD> of the page you would like to use the icon for - if you want to use it for any page that a shortcut is created for, you'll need to paste the code into each page individually. The code is below:
<link rel="apple-touch-icon" href="/sitefiles/12345/678/90/apple-touch-icon.png">
The informational following the href is the file path for the file you just uploaded. This must be the file unique to your site.
To get the file path for the icon that you've uploaded, simply click the 'link' icon on the 'Files' section.

This will then displayed the URL for the icon.

Copy and paste this file path exactly as it appears into the code below.
<link rel="apple-touch-icon" href="INSERT_FILE_PATH_HERE">
To then add this code to your custom <HEAD>:
- Click 'Content' from the top menu
- Click the options icon beside the page you would like to add the icon for
- Click the 'Meta Info' tab
- Paste the code into the 'Custom <HEAD>' field
- Save changes and repeat as necessary
- You will need to publish your site for the changes to apply
Testing The Icon
It can take several hours for the icon to update once your site is published. When you're ready to test, simply follow the steps below on your iOS-enabled device (such as an iPad or iPhone):
- On your iOS device, open your Safari browser and go to the page on your site that you would like to make a shortcut for
- Click the share icon in the browser

- Select the option 'Add to Home Screen'

- On the 'Add to Home' page you should be able to see the icon you uploaded on the left

If you do not see the icon you uploaded, please double-check that you have followed the steps above, including formatting the file as required.
Subscribe to:
Posts (Atom)