Showing posts with label mac. Show all posts

Monday, July 16, 2018

How to Uninstall Node.js from Mac OSX

Just keep in mind that these commands will remove the Node executable, and not necessarily all of the Node projects or NPM cache.

Manually

If you installed Node either by source or from a binary distribution then you'll likely have to delete the executable and other resources manually. Unfortunately, this isn't easy since there are quite a few directories containing Node resources, like npm and node_modules.
To completely uninstall the node executable as well as npm, here are some instructions on what to do:
Note that not all of the directories listed here may exist on your system depending on your install method.
  • Delete node and/or node_modules from /usr/local/lib
  • Delete node and/or node_modules from /usr/local/include
  • Delete node, node-debug, and node-gyp from /usr/local/bin
  • Delete .npmrc from your home directory (these are your npm settings, don't delete this if you plan on re-installing Node right away)
  • Delete .npm from your home directory
  • Delete .node-gyp from your home directory
  • Delete .node_repl_history from your home directory
  • Delete node* from /usr/local/share/man/man1/
  • Delete npm* from /usr/local/share/man/man1/
  • Delete node.d from /usr/local/lib/dtrace/
  • Delete node from /opt/local/bin/
  • Delete node from /opt/local/include/
  • Delete node_modules from /opt/local/lib/
  • Delete node from /usr/local/share/doc/
  • Delete node.stp from /usr/local/share/systemtap/tapset/
This list should include just about all the references to Node on your system. Keep in mind there may be more. Please let me know if you find any others (and how you installed Node originally)!

Homebrew

The Homebrew method is arguably one of the easiest ways to get Node on and off your system. The command to remove it is just as simple as the command to install it. Assuming you used brew install node to install it, just execute this to get rid of it:
$ brew uninstall node
And that's it! All traces of the executable will be gone from your system.

NVM

The Node Version Manager (NVM) is almost as convenient as Homebrew, but in a different way. It allows you to install multiple versions of Node on your system so you can easily switch from one to the other.
Eventually, you'll probably want to get rid of one of the versions when you're done with it. And like Homebrew, you can easily do this using a command similar to the way you installed it:
$ nvm uninstall <version>
And a complete example of this might be something like:
$ nvm uninstall v0.12.2
And now only version v0.12.2 of Node will be uninstalled. Keep in mind that if you had multiple versions installed, then Node will still be on your system, but not v0.12.2 (using the example above).

Phantom Installs

If for some reason none of the above methods worked for you, then you can always hunt down the executable using the command line tool which. This command shows you the location of the file for a given command.
We can use this to find where Node is installed on your system. You can try this with:
$ which node
/Users/Kasinathantechnology/.nvm/versions/node/v4.1.2/bin/node
You can see in the output that my node command is linked to an NVM version, although yours may be located somewhere else. Now I can use this info to uninstall it.
Using this tool should help you find out how the executable was installed or how to remove it manually.

Wednesday, March 21, 2018

Format an External Hard Drive or USB Flash Drive for Mac OS X

How to Format an External Drive for Mac Compatibility
This is a simple procedure and is achieved the same way for all drive types and through all connections, be they USB, Firewire, or Thunderbolt. Formatting a drive will erase all data and partitions on the disk:
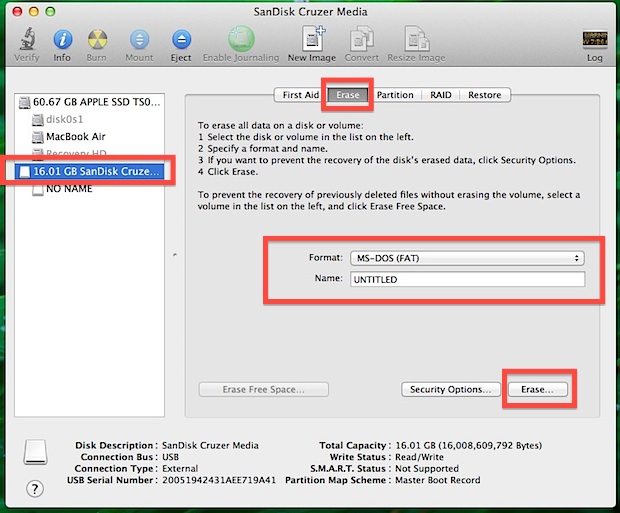
  1. Connect the hard drive or USB key to the Mac
  2. Launch Disk Utility, located in Applications > Utilities
  3. Locate the drive name from the left hand side of Disk Utility and click on it
  4. Click on the “Erase” tab across the top
  5. Format a USB Flash Drive for use in Mac OS X
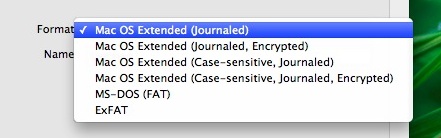
  6. Next to “Format:” click the contextual menu and select “Mac OS Extended (Journaled)”
  7. Format to Mac Filesystem
  8. Name the drive if you want, the name can be changed at any point
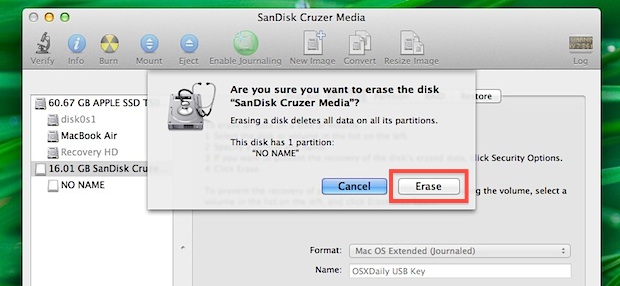
  9. Click the “Erase” button and confirm again on the next pop-up window
Format a USB Drive for use on a Mac
That’s all there is to it, the drive will now format and erase everything on it.
Smaller external hard drives, SSD’s, and USB flash keys format quickly, while a larger hard drive may take a while longer. When completed, the drive will be formatted to the Mac OS X compatible HFS+ filesystem.
The videos below demonstrate the complete process of formatting an external hard drive for full Mac OS X compatibility, this uses the new Disk Utility in modern versions of OS X:
Similarly, you can perform the same type of process in OS X for making a USB flash drive compatible with Mac OS using the Disk Utility in OS X, as you can see, it’s a quick procedure that is done in short order on any Mac:
Should you intend to make an OS X installer drive or create any other bootable Mac OS X volume from a drive, or use a new drive as a fully compatible Time Machine backup drive, you will also need to complete this process.

Wednesday, April 4, 2012

How to Rename Your Wireless Apple Mouse, Magic Mouse

As many of you should know, Apple has recently launched a new, Multi-Touch capable mouse - the Magic Mouse. The older mouse didn’t leave the scene as the new one arrived, although Apple is heavily promoting the new peripheral. The two mice have something in common - they’re Bluetooth-capable and work with Mac OS X wirelessly.

Wireless mice are great to use. You feel completely free to handle them any way you want. With Apple mice, the functionality goes above that of traditional mice. They’re even allowed to have their own name, like “John’s Mouse,” or “My Super-Cool Mouse.” But how do you give your mouse a name, or how do you change the name of an Apple wireless mouse, in case you’re the not the first person to use it? This short tutorial will let you in on that secret.

Upon setting up your wireless Apple mouse (whether it’s the former Mighty Mouse, or the new, exquisite Magic Mouse), Mac OS X pairs the device to the computer you’re going to use it with, and automatically assigns it a name. The name is assigned based on your computer’s name (root directory). However, if you want to change it, you can. Here's how.

(don't forget to click on the images for a larger view)

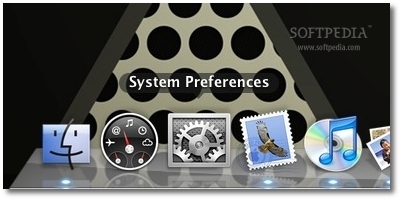
1. With your wireless mouse connected and working, launch System Preferences.

Review image


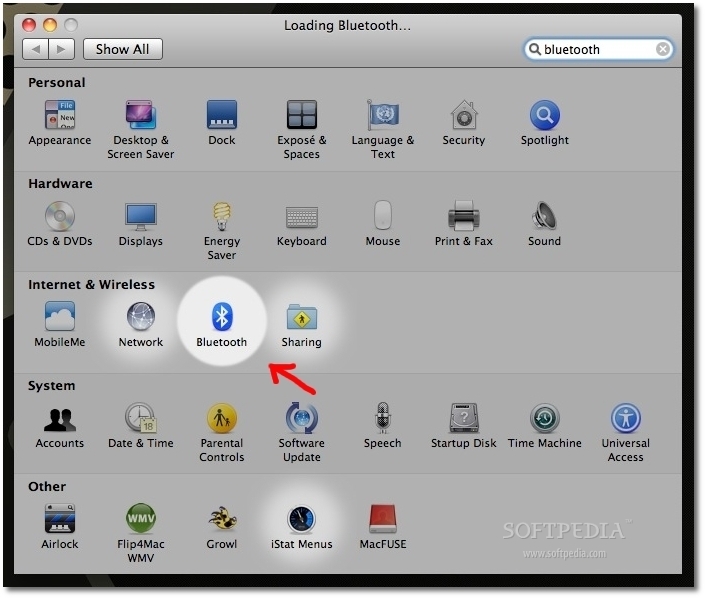
2. For one reason or another, Apple decided not to include the option to rename your paired devices at first glance. So, instead of choosing “Mouse,” choose “Bluetooth.” It should be on the third row down, between “Network and “Sharing.”

Review image

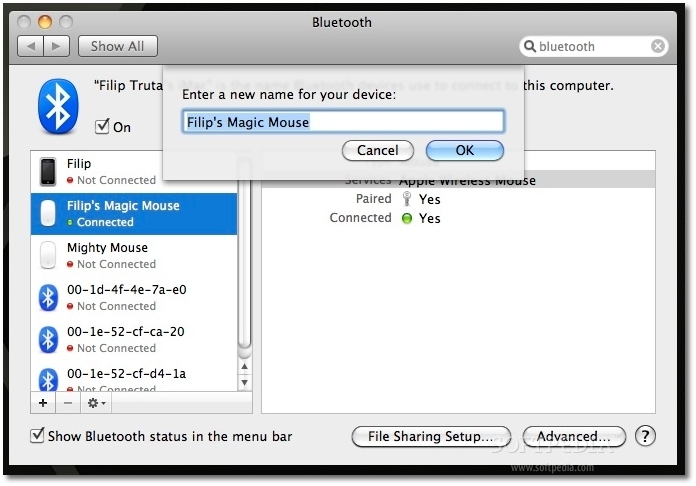
3. Once in Bluetooth prefs, select the mouse you want to rename and click the small cogwheel, located under the list of paired devices (the cogwheel is found throughout Mac OS X and typically hides more options).

Review image

4. As shown above, select “rename.” A drop-down menu will appear containing a field where you can write down the new name of your mouse - as shown in the screenshot below.

Review image

5. Hit OK, and close System Prefs. That’s it!

You can now check out your rodent’s new name by clicking on the Bluetooth icon in the menubar, located at the top right side of your Mac’s screen.

Review image

Tuesday, April 3, 2012

App Store Review Guidelines


Introduction

We're pleased that you want to invest your talents and time to develop applications for iOS. It has been a rewarding experience - both professionally and financially - for tens of thousands of developers and we want to help you join this successful group. We have published our App Store Review Guidelines in the hope that they will help you steer clear of issues as you develop your app and speed you through the approval process when you submit it.
We view Apps different than books or songs, which we do not curate. If you want to criticize a religion, write a book. If you want to describe sex, write a book or a song, or create a medical app. It can get complicated, but we have decided to not allow certain kinds of content in the App Store. It may help to keep some of our broader themes in mind:
  • We have lots of kids downloading lots of apps, and parental controls don't work unless the parents set them up (many don't). So know that we're keeping an eye out for the kids.
  • We have over 350,000 apps in the App Store. We don't need any more Fart apps. If your app doesn't do something useful or provide some form of lasting entertainment, it may not be accepted.
  • If your App looks like it was cobbled together in a few days, or you're trying to get your first practice App into the store to impress your friends, please brace yourself for rejection. We have lots of serious developers who don't want their quality Apps to be surrounded by amateur hour.
  • We will reject Apps for any content or behavior that we believe is over the line. What line, you ask? Well, as a Supreme Court Justice once said, "I'll know it when I see it". And we think that you will also know it when you cross it.
  • If your app is rejected, we have a Review Board that you can appeal to. If you run to the press and trash us, it never helps.
  • If you attempt to cheat the system (for example, by trying to trick the review process, steal data from users, copy another developer's work, or manipulate the ratings) your apps will be removed from the store and you will be expelled from the developer program.
  • This is a living document, and new apps presenting new questions may result in new rules at any time. Perhaps your app will trigger this.
Lastly, we love this stuff too, and honor what you do. We're really trying our best to create the best platform in the world for you to express your talents and make a living too. If it sounds like we're control freaks, well, maybe it's because we're so committed to our users and making sure they have a quality experience with our products. Just like almost all of you are too.

Table of Contents

1. Terms and conditions

  • 1.1

    As a developer of applications for the App Store you are bound by the terms of the Program License Agreement (PLA), Human Interface Guidelines (HIG), and any other licenses or contracts between you and Apple. The following rules and examples are intended to assist you in gaining acceptance for your app in the App Store, not to amend or remove provisions from any other agreement.

2. Functionality

  • 2.1

    Apps that crash will be rejected
  • 2.2

    Apps that exhibit bugs will be rejected
  • 2.3

    Apps that do not perform as advertised by the developer will be rejected
  • 2.4

    Apps that include undocumented or hidden features inconsistent with the description of the app will be rejected
  • 2.5

    Apps that use non-public APIs will be rejected
  • 2.6

    Apps that read or write data outside its designated container area will be rejected
  • 2.7

    Apps that download code in any way or form will be rejected
  • 2.8

    Apps that install or launch other executable code will be rejected
  • 2.9

    Apps that are "beta", "demo", "trial", or "test" versions will be rejected
  • 2.10

    iPhone apps must also run on iPad without modification, at iPhone resolution, and at 2X iPhone 3GS resolution
  • 2.11

    Apps that duplicate apps already in the App Store may be rejected, particularly if there are many of them, such as fart, burp, flashlight, and Kama Sutra apps.
  • 2.12

    Apps that are not very useful, are simply web sites bundled as apps, or do not provide any lasting entertainment value may be rejected
  • 2.13

    Apps that are primarily marketing materials or advertisements will be rejected
  • 2.14

    Apps that are intended to provide trick or fake functionality that are not clearly marked as such will be rejected
  • 2.15

    Apps larger than 20MB in size will not download over cellular networks (this is automatically prohibited by the App Store)
  • 2.16

    Multitasking apps may only use background services for their intended purposes: VoIP, audio playback, location, task completion, local notifications, etc.
  • 2.17

    Apps that browse the web must use the iOS WebKit framework and WebKit Javascript
  • 2.18

    Apps that encourage excessive consumption of alcohol or illegal substances, or encourage minors to consume alcohol or smoke cigarettes, will be rejected
  • 2.19

    Apps that provide incorrect diagnostic or other inaccurate device data will be rejected
  • 2.20

    Developers "spamming" the App Store with many versions of similar apps will be removed from the iOS Developer Program
  • 2.21

    Apps that are simply a song or movie should be submitted to the iTunes store. Apps that are simply a book should be submitted to the iBookstore.
  • 2.22

    Apps that arbitrarily restrict which users may use the app, such as by location or carrier, may be rejected
  • 2.23

    Apps must follow the iOS Data Storage Guidelines or they will be rejected
  • 2.24

    Apps that are offered in Newsstand must comply with schedules 1, 2 and 3 of the Developer Program License Agreement or they will be rejected

3. Metadata (name, descriptions, ratings, rankings, etc)

  • 3.1

    Apps or metadata that mentions the name of any other mobile platform will be rejected
  • 3.2

    Apps with placeholder text will be rejected
  • 3.3

    Apps with descriptions not relevant to the application content and functionality will be rejected
  • 3.4

    App names in iTunes Connect and as displayed on a device should be similar, so as not to cause confusion
  • 3.5

    Small and large app icons should be similar, so as to not to cause confusion
  • 3.6

    Apps with app icons and screenshots that do not adhere to the 4+ age rating will be rejected
  • 3.7

    Apps with Category and Genre selections that are not appropriate for the app content will be rejected
  • 3.8

    Developers are responsible for assigning appropriate ratings to their apps. Inappropriate ratings may be changed/deleted by Apple
  • 3.9

    Developers are responsible for assigning appropriate keywords for their apps. Inappropriate keywords may be changed/deleted by Apple
  • 3.10

    Developers who attempt to manipulate or cheat the user reviews or chart ranking in the App Store with fake or paid reviews, or any other inappropriate methods will be removed from the iOS Developer Program
  • 3.11

    Apps which recommend that users restart their iOS device prior to installation or launch may be rejected
  • 3.12

    Apps should have all included URLs fully functional when you submit it for review, such as support and privacy policy URLs

4. Location

  • 4.1

    Apps that do not notify and obtain user consent before collecting, transmitting, or using location data will be rejected
  • 4.2

    Apps that use location-based APIs for automatic or autonomous control of vehicles, aircraft, or other devices will be rejected
  • 4.3

    Apps that use location-based APIs for dispatch, fleet management, or emergency services will be rejected
  • 4.4

    Location data can only be used when directly relevant to the features and services provided by the app to the user or to support approved advertising uses

5. Push notifications

  • 5.1

    Apps that provide Push Notifications without using the Apple Push Notification (APN) API will be rejected
  • 5.2

    Apps that use the APN service without obtaining a Push Application ID from Apple will be rejected
  • 5.3

    Apps that send Push Notifications without first obtaining user consent will be rejected
  • 5.4

    Apps that send sensitive personal or confidential information using Push Notifications will be rejected
  • 5.5

    Apps that use Push Notifications to send unsolicited messages, or for the purpose of phishing or spamming will be rejected
  • 5.6

    Apps cannot use Push Notifications to send advertising, promotions, or direct marketing of any kind
  • 5.7

    Apps cannot charge users for use of Push Notifications
  • 5.8

    Apps that excessively use the network capacity or bandwidth of the APN service or unduly burden a device with Push Notifications will be rejected
  • 5.9

    Apps that transmit viruses, files, computer code, or programs that may harm or disrupt the normal operation of the APN service will be rejected

6. Game Center

  • 6.1

    Apps that display any Player ID to end users or any third party will be rejected
  • 6.2

    Apps that use Player IDs for any use other than as approved by the Game Center terms will be rejected
  • 6.3

    Developers that attempt to reverse lookup, trace, relate, associate, mine, harvest, or otherwise exploit Player IDs, alias, or other information obtained through the Game Center will be removed from the iOS Developer Program
  • 6.4

    Game Center information, such as Leaderboard scores, may only be used in apps approved for use with the Game Center
  • 6.5

    Apps that use Game Center service to send unsolicited messages, or for the purpose of phishing or spamming will be rejected
  • 6.6

    Apps that excessively use the network capacity or bandwidth of the Game Center will be rejected
  • 6.7

    Apps that transmit viruses, files, computer code, or programs that may harm or disrupt the normal operation of the Game Center service will be rejected

7. iAd

  • 7.1

    Apps that artificially increase the number of impressions or click-throughs of ads will be rejected
  • 7.2

    Apps that contain empty iAd banners will be rejected
  • 7.3

    Apps that are designed predominantly for the display of ads will be rejected

8. Trademarks and trade dress

  • 8.1

    Apps must comply with all terms and conditions explained in the Guidelines for Using Apple Trademarks and Copyrights and the Apple Trademark List
  • 8.2

    Apps that suggest or infer that Apple is a source or supplier of the app, or that Apple endorses any particular representation regarding quality or functionality will be rejected
  • 8.3

    Apps which appear confusingly similar to an existing Apple product or advertising theme will be rejected
  • 8.4

    Apps that misspell Apple product names in their app name (i.e., GPS for Iphone, iTunz) will be rejected
  • 8.5

    Use of protected 3rd party material (trademarks, copyrights, trade secrets, otherwise proprietary content) requires a documented rights check which must be provided upon request
  • 8.6

    Google Maps and Google Earth images obtained via the Google Maps API can be used within an application if all brand features of the original content remain unaltered and fully visible. Apps that cover up or modify the Google logo or copyright holders identification will be rejected

9. Media content

  • 9.1

    Apps that do not use the MediaPlayer framework to access media in the Music Library will be rejected
  • 9.2

    App user interfaces that mimic any iPod interface will be rejected
  • 9.3

    Audio streaming content over a cellular network may not use more than 5MB over 5 minutes
  • 9.4

    Video streaming content over a cellular network longer than 10 minutes must use HTTP Live Streaming and include a baseline 64 kbps audio-only HTTP Live stream

10. User interface

  • 10.1

    Apps must comply with all terms and conditions explained in the Apple iOS Human Interface Guidelines
  • 10.2

    Apps that look similar to apps bundled on the iPhone, including the App Store, iTunes Store, and iBookstore, will be rejected
  • 10.3

    Apps that do not use system provided items, such as buttons and icons, correctly and as described in the Apple iOS Human Interface Guidelines may be rejected
  • 10.4

    Apps that create alternate desktop/home screen environments or simulate multi-app widget experiences will be rejected
  • 10.5

    Apps that alter the functions of standard switches, such as the Volume Up/Down and Ring/Silent switches, will be rejected
  • 10.6

    Apple and our customers place a high value on simple, refined, creative, well thought through interfaces. They take more work but are worth it. Apple sets a high bar. If your user interface is complex or less than very good, it may be rejected

11. Purchasing and currencies

  • 11.1

    Apps that unlock or enable additional features or functionality with mechanisms other than the App Store will be rejected
  • 11.2

    Apps utilizing a system other than the In App Purchase API (IAP) to purchase content, functionality, or services in an app will be rejected
  • 11.3

    Apps using IAP to purchase physical goods or goods and services used outside of the application will be rejected
  • 11.4

    Apps that use IAP to purchase credits or other currencies must consume those credits within the application
  • 11.5

    Apps that use IAP to purchase credits or other currencies that expire will be rejected
  • 11.6

    Content subscriptions using IAP must last a minimum of 7 days and be available to the user from all of their iOS devices
  • 11.7

    Apps that use IAP to purchase items must assign the correct Purchasability type
  • 11.8

    Apps that use IAP to purchase access to built-in capabilities provided by iOS, such as the camera or the gyroscope, will be rejected
  • 11.9

    Apps containing "rental" content or services that expire after a limited time will be rejected
  • 11.10

    Insurance applications must be free, in legal-compliance in the regions distributed, and cannot use IAP
  • 11.11

    In general, the more expensive your app, the more thoroughly we will review it
  • 11.12

    Apps offering subscriptions must do so using IAP, Apple will share the same 70/30 revenue split with developers for these purchases, as set forth in the Developer Program License Agreement.
  • 11.13

    Apps that link to external mechanisms for purchases or subscriptions to be used in the app, such as a “buy” button that goes to a web site to purchase a digital book, will be rejected
  • 11.14

    Apps can read or play approved content (specifically magazines, newspapers, books, audio, music, and video) that is subscribed to or purchased outside of the app, as long as there is no button or external link in the app to purchase the approved content. Apple will not receive any portion of the revenues for approved content that is subscribed to or purchased outside of the app

12. Scraping and aggregation

  • 12.1

    Applications that scrape any information from Apple sites (for example from apple.com, iTunes Store, App Store, iTunes Connect, Apple Developer Programs, etc) or create rankings using content from Apple sites and services will be rejected
  • 12.2

    Applications may use approved Apple RSS feeds such as the iTunes Store RSS feed
  • 12.3

    Apps that are simply web clippings, content aggregators, or a collection of links, may be rejected

13. Damage to device

  • 13.1

    Apps that encourage users to use an Apple Device in a way that may cause damage to the device will be rejected
  • 13.2

    Apps that rapidly drain the device's battery or generate excessive heat will be rejected

14. Personal attacks

  • 14.1

    Any app that is defamatory, offensive, mean-spirited, or likely to place the targeted individual or group in harms way will be rejected
  • 14.2

    Professional political satirists and humorists are exempt from the ban on offensive or mean-spirited commentary

15. Violence

  • 15.1

    Apps portraying realistic images of people or animals being killed or maimed, shot, stabbed, tortured or injured will be rejected
  • 15.2

    Apps that depict violence or abuse of children will be rejected
  • 15.3

    "Enemies" within the context of a game cannot solely target a specific race, culture, a real government or corporation, or any other real entity
  • 15.4

    Apps involving realistic depictions of weapons in such a way as to encourage illegal or reckless use of such weapons will be rejected
  • 15.5

    Apps that include games of Russian roulette will be rejected

16. Objectionable content

  • 16.1

    Apps that present excessively objectionable or crude content will be rejected
  • 16.2

    Apps that are primarily designed to upset or disgust users will be rejected

17. Privacy

  • 17.1

    Apps cannot transmit data about a user without obtaining the user's prior permission and providing the user with access to information about how and where the data will be used
  • 17.2

    Apps that require users to share personal information, such as email address and date of birth, in order to function will be rejected
  • 17.3

    Apps that target minors for data collection will be rejected

18. Pornography

  • 18.1

    Apps containing pornographic material, defined by Webster's Dictionary as "explicit descriptions or displays of sexual organs or activities intended to stimulate erotic rather than aesthetic or emotional feelings", will be rejected
  • 18.2

    Apps that contain user generated content that is frequently pornographic (ex "Chat Roulette" apps) will be rejected

19. Religion, culture, and ethnicity

  • 19.1

    Apps containing references or commentary about a religious, cultural or ethnic group that are defamatory, offensive, mean-spirited or likely to expose the targeted group to harm or violence will be rejected
  • 19.2

    Apps may contain or quote religious text provided the quotes or translations are accurate and not misleading. Commentary should be educational or informative rather than inflammatory

20. Contests, sweepstakes, lotteries, and raffles

  • 20.1

    Sweepstakes and contests must be sponsored by the developer/company of the app
  • 20.2

    Official rules for sweepstakes and contests, must be presented in the app and make it clear that Apple is not a sponsor or involved in the activity in any manner
  • 20.3

    It must be permissible by law for the developer to run a lottery app, and a lottery app must have all of the following characteristics: consideration, chance, and a prize
  • 20.4

    Apps that allow a user to directly purchase a lottery or raffle ticket in the app will be rejected

21. Charities and contributions

  • 21.1

    Apps that include the ability to make donations to recognized charitable organizations must be free
  • 21.2

    The collection of donations must be done via a web site in Safari or an SMS
  • 22.1

    Apps must comply with all legal requirements in any location where they are made available to users. It is the developer's obligation to understand and conform to all local laws
  • 22.2

    Apps that contain false, fraudulent or misleading representations will be rejected
  • 22.3

    Apps that solicit, promote, or encourage criminal or clearly reckless behavior will be rejected
  • 22.4

    Apps that enable illegal file sharing will be rejected
  • 22.5

    Apps that are designed for use as illegal gambling aids, including card counters, will be rejected
  • 22.6

    Apps that enable anonymous or prank phone calls or SMS/MMS messaging will be rejected
  • 22.7

    Developers who create apps that surreptitiously attempt to discover user passwords or other private user data will be removed from the iOS Developer Program
  • 22.8

    Apps which contain DUI checkpoints that are not published by law enforcement agencies, or encourage and enable drunk driving, will be rejected

Living document

This document represents our best efforts to share how we review apps submitted to the App Store, and we hope it is a helpful guide as you develop and submit your apps. It is a living document that will evolve as we are presented with new apps and situations, and we'll update it periodically to reflect these changes.
Thank you for developing for iOS. Even though this document is a formidable list of what not to do, please also keep in mind the much shorter list of what you must do. Above all else, join us in trying to surprise and delight users. Show them their world in innovative ways, and let them interact with it like never before. In our experience, users really respond to polish, both in functionality and user interface. Go the extra mile. Give them more than they expect. And take them places where they have never been before. We are ready to help.

Checklist for Submitting an App to the App Store

Before you can release a paid app to the App Store, you must agree to all of the paid app contracts, and submit your tax and bank routing info. This should be done in iTunes Connect. For best results you should fill this out before you even begin working on any apps, because it can take several weeks for the contracts to be approved by Apple.

Preparation

1. Complete all of the coding and testing on your app.
2. Update the Appname-info.plist file in your app.
  1. Set the bundle identifier (if you haven't already) to YourAppName. (Remove the com.apple.whatever stuff.) The Identifier should not contain spaces or funny characters - alphanumeric and dashes are ok.
  2. If you want your app to be named something different on the actual device than its name in Xcode, change the "Bundle display name" as well.
  3. Update the bundle version. If this is your first time submitting this app, the version number should probably be 1.0.
  4. Be sure the icon file is set.
3. Build the app for distribution.
4. Write a description for your app for the app store. The app upload page says the description should be 700 characters or less, but that limit doesn't seem to be enforced.
5. Choose a numeric SKU for your app. This can't be left blank, and it has to be a unique number for each of your apps. (I usually use YYMM, like 0902, but you can use whatever you want as long as it's a number.)
6. Assemble your screenshots. You'll need at least one primary screenshot, and up to four more secondary screenshots. Be sure they're the right size: 640 x 960 for high resolution iPhone screenshots; 1024 x 768 for iPad screenshots.
7. Prepare your iTunes artwork. This is a 512 x 512 pixel 72dpi JPEG. It should match your icon artwork as closely as possible - apps are sometimes rejected if these two images are dissimilar.
When you've got all that prepared, you're ready to set up your app in iTunes Connect.

iTunes Connect

When you log into developer.apple.com/iphone, there's a link to iTunes Connect on the right. Once you're logged into iTunes Connect, click on "Manage Your Applications", then "Add New Application".
The app details page asks for your app name, description, copyright info, version number, SKU, application URL and support URL and support e-mail address (all of these are required). The URLs you enter translate to:
iTunes Connect calls it: What it shows on your app's page in iTunes:
"Application URL" "CompanyName Web Site"
"Support URL" "Appname Support"
If this is your first time uploading an app to the app store, and you enrolled as an individual developer, you'll be asked if you want to set a Company Name. Think carefully about this - once you set it, you can NOT change it without calling Apple and going through their phone support line. If you set a company name then all of your apps will show it.
This is also where you should upload the iTunes artwork and screenshots.
Ratings: You'll be asked to rate your app by indicating whether it includes any offensive material.
Pricing and availability: this is where you set the price and release date for your app. You'll get a chance to review this after you select a pricing tier. The page should show a link to the pricing tiers, but if it doesn't show one initially, just set the price to anything and let it refresh. The link should show up then.

Free
Tier1 - 0.99
Tier 2 - 1.99
Tier 3 - 2.99
Tier 4 - 3.99
Tier 5 - 4.99
Tier 6 - 5.99
And so on. Release date: This defaults to the current date, but you can set it to a date in the future* if you like. When your app is approved, you'll want to log back into iTunes Connect and reset the release date to the approval date; that way the app will show up at the top of the new releases section of its category. If you fail to do this, then when your app gets approved it'll show up buried several pages down - not very desirable.
*if you're submitting an app UPDATE, however, you shouldn't touch the release date until you get word that your update has been approved. If you change the release date of an update to sometime in the future, then your CURRENT app will vanish from the app store!
Once you've finished setting up info on your new app, go to the app details page and click on the Ready to Upload Binary button.

Submitting Your App

Starting with Xcode 4, apps are now submitted from within Xcode. You should build a release build of your app, and be sure it appears in the Archived list in the Organizer (Window -> Organizer).


To submit your app to Apple, you'll first need to Validate the app, then Submit it. Select your application from the list of archived apps, then click the Validate button on the right. Xcode will prompt you for your iTunes Connect login credentials, and proceed to validate the app. If all goes well, the Status column will change to "Passed Validation". Then you can click the Submit button to upload it to Apple. When the upload finishes, the Status column will say "Submitted":


Once your app has been submitted, the app's status in iTunes Connect will change to "Waiting for Review". Now you just have to wait for Apple to review and (hopefully) approve your app. This usually takes about a week, sometimes longer. If you log into the iOS Developer Center and go to the App Store Approval Process page, you'll find an App Store Review Status section that Apple keeps (more or less) updated with the percentage of apps that are approved within the past week.
While you're waiting for approval, you should set up a web page for your app.

After Approval

When your app is approved, you'll get an email saying your app is ready for sale. You should log back into iTunes Connect and change your app's availability date to today. This way your app will appear at the top of the "new releases" list in its category. You can only do this on the date your app was approved.
You can change most of the app details any time after your app is approved; if you want to re-word the description, or upload new screenshots, or change the price of your app, you can do so without having to go through the approval process again. The only time you'll have to wait for approval is when you submit an update (a new binary) to an app. Also, you can only change keywords or ratings when you upload a new binary.

Wednesday, June 8, 2011

Difference between 2 UIDatePicker’s in hours

UIDatePicker *date1;
UIDatePicker *date2;

The function to show difference between these two date pickers


NSDate *date1Val = date1.date;
NSDate *date2Val = date2.date;
NSTimeInterval interval = [date2Val timeIntervalSinceDate:date1Val];
int hours = (int)interval / 3600;
int minutes = (interval - (hours*3600)) / 60;
NSString *timeDiff = [NSString stringWithFormat:@"%d:%d", hours, minutes];

Hacking into PhoneGap iPhone/iPad Apps

Initially a lot of web-developers started with PhoneGap which lets you make webpages and embed them inside an iPhone app.

Now similarly its very easy to get access to those web pages. Let me show you how.
Steps:
Get hold of an phonegap iPhone App. I have one, which I had created a long time back.
- So go to – http://www.phonegap.com/apps
- Select iPhone or iPad
- Pick an app for which you want code (Let me pick my application)


- Get the link to the app and open with iTunes

Download the app. It will save the app in your Apps Folder

Right Click on the app and select “Show in Finder”
You will see the .ipa file.
TicTacToe 1.1.ipa
Rename it to
TicTacToe 1.1.zip
Unzip the file and you will find something like this

Right Click on TicTacToe and select “Show Package Contents” – There will be mostly a folder in it “www” which will have the entire HTML, JS and CSS files or whatever the person used.

Thursday, June 2, 2011

Mac Terminal Error : Could not determine audit condition

When I launched my terminal today, was welcomed with this error :-

login: PAM Error (line 396): System error
login: Could not determine audit condition

[Process completed]

It is most probably because I was playing with my /usr/bin permissions the other day.
The fix is easy. Just delete the "/usr/bin/login" dir.

But how do I delete it, if I can't access the "Terminal" altogether ?
Come on - You can access any folder using the "Finder".

1. Open "Finder"
2. Open "Go To Folder"
3. Type "/usr/bin/login"
4. Delete it.

Thursday, May 5, 2011

Debugging Tutorial – Automating Your Tests With A UIRecorder Instrument

If you have ever experienced a bug in your application that took many steps to reproduce, then this tutorial is for you.  By nature, testing and debugging are very tedious processes.  This is especially the case for the iPhone.
Say you have an app that drills down 5-levels deep to some other view.  Now let’s say that you have a bug on that view 5 levels deep.  Your normal method of debugging is:
  • Run the app
  • Tap view 1
  • Tap view 2
  • Tap view 3
  • Tap view 4
  • Tap view 5
  • (Crash)
  • Change some code
  • Repeat
As you can see (and I’m sure have noticed), this sucks.  Well, Kendall Gelner gave a killer talk at 360iDev (which I recently attended) on various debugging tips using Instruments and XCode.  One of the most useful techniques (to me) was how to automate your testing.  Let me show you what I mean.

1. Open up the app you wish to test/debug
2. Launch it in the simulator
3. Open Instruments – This is located in /Developer/Applications/Instruments (just do a spotlight search for it)

screenshot_01

4. Select UIRecorder and click Choose - You should now see a window like this

screenshot_02

5. Now, we need to attach this tool to the iPhone Simulator process.  Click the drop-down above  

Default Target -> Attach to Process -> iPhone Simulator.


ss_03

6. Now click Drive & Record and do all of the steps in the simulator to test your app.  At this point, the UI Recorder is recording your every move.  When you have finished press the Stop button. Note: After you have recorded your actions, don’t move the simulator as it will mess up the entire process.
7. Modify your code…
8. Press the Drive & Record button and watch the magic happen.  The test is automatically done for you.  You should see your mouse move over to the simulator and the system mimicking every action that you did before.
That’s it! I know this isn’t a super long tutorial (or even a coding tutorial), but the UI Recorder has sped my test time up tremendously.  Give it a shot and let me know what you think.  Here is a short video of me going through all of the steps.

video tutorial

Backup iPhone Pictures – Mac Tips

Listen to this episode
When you have problems with your iPhone, you may have no other choice than to RESTORE it back to the factory state. Before you restore, iTunes says it is making a backup of your phone. However, it isn’t making a backup of any photos you have taken with it. So when the phone is restored, all of your photos will be gone. The good news is that If you have your iPhone set to sync your photos with iPhoto automatically when you plug it in, you may be OK. However, if you are like me and choose for the iPhone not to launch iPhoto when you connect it… well, you need to backup those pics.

How to do it:

1. Plug-in your iPhone and launch iPhoto. iPhoto will detect your iPhone, and you can now choose to import all or import selected pictures.
mactips_358_1.png
Doing this will add pictures you have taken with your iPhone into your iPhoto library.

Another Way – Image Capture

You can also use Image Captureimagecapture.png to do the same thing, but not add them to your iPhoto library.
1. Plug-in your iPhone. Launch Image Capture. You can find it in your Applications folder. If you don’t see it there, look in the Utilities folder. Note: On the podcast, I said it will be in the utilities folder… I forgot that it may reside in Applications.
2. Now it will detect your iPhone, and you can choose to Download Some or Download ALL to your Mac.
mactips_358_2.png

Creating Digital Mockups For Your Apps


While conceptualizing your App, the first things you need to create is a flow chart of how your App will behave and some reference templates and images that will show you how each screen will look in your App. Here are some tools to help you do this.
While conceptualizing your App, the first things you need to create is a flow chart of how your App will behave and some reference templates and images that will show you how each screen will look in your App.

The first step to doing this is to get hold of a pencil and paper and make some rough sketches. Start by making a list of all the possible screens your app will have and then actually listing the functionality each screen will have. Once you have that, you can proceed to make some dummy mockup sketches. At this point you should focus on the “placement” elements of each screen… that is decide, what goes where. Next you can start to imagine the design elements and look and feel of each screen – and how they will all look similar and connect to one another. A flow chart showing how the connect up – will help. I suggest you get hold of a spiral bound sketch book and not lose sheets of paper, that can easily get misplaced. Any writing pad will also do.

To help you make your hard copy and soft copy drawings, these downloadable documents and plans will help you. They will be useful when you are brainstorming or trying to find the perfect flow for your app and putting the visual elements together.
  • Mock App – Templates for Keynote and Powerpoint
  • Yahoo Design Stencils – Yahoo! Design Stencil Kit version 1.0 is available for OmniGraffle, Visio (XML), Adobe Illustrator (PDF and SVG), and Adobe Photoshop (PNG)
Download each of the above packs and files as they are all must have tools when you or your graphic artist are planning the User Interface or graphic design of your Apps.

Installing GIT on OS-X In 3 Minutes

How to install GIT on OS-X in under 3 minutes:

curl http://kernel.org/pub/software/scm/git/git-1.7.1.tar.gz -O
tar xzvf git-1.7.1.tar.gz
cd git-1.7.1
make configure
./configure --prefix=/usr/local
NO_MSGFMT=yes make prefix=/usr/local all
sudo make install
 
Git should be installed on your OS-X now, which you can verify by issuing: git --version command in Terminal. However, it’s a good idea to also pre-configure the default username and e-mail for your Git installation:

git config --global user.name "Your Firstname Lastname"
git config --global user.email "username@example.com"
git config --global --list
 
I personally, also like to set:

git config --global color.ui "auto"

How to Setting up the GIT

Setting Up

Now that you have the pre-reqs all ready, you can proceed with the install.  Open a terminal and cd into the directory where you want to install things.  Then type the following (or just copy and paste the items below):

git clone git://github.com/sproutit/sproutcore-abbot.git abbot
cd abbot
rake init
cd ..
git clone git://github.com/sproutit/sproutcore-samples.git samples
cd samples
mkdir -p frameworks
cd frameworks
git clone git://github.com/sproutit/sproutcore.git sproutcore
cd ../..

Add the path to abbot/bin to the beginning of your PATH to be able run the abbot command-line tools (sc-init, sc-server, sc-build, sc-gen, sc-manifest, sc-docs, and more) without having to enter the full path:
export PATH=`pwd`/abbot/bin:$PATH
Make sure you have configured your github account with SSH Keys and Username/Email (Without setting up the SSH key for your machine, you will get a permission denied error when trying to initialize the Git repository)
You should now have the full set of SproutCore tools running the latest Abbot-compatible code.

How to take Screenshot in Mac


In the article you’ll learn how to take screenshot in mac os. Although it’s very easy and quite interesting work but for the new users it’s bit confusing.
But anyways…to take the screenshots in mac os press “Command button +Shift+3″ and it’ll capture & save the image on desktop.
Apart from it there are many more interesting commands to take the screenshot, let’s see below…
1. To select the area and then take the screenshot give following command
“Command button +Shift+4″
2. Press “Command+Shift+4+space” if you wanted to take the screenshot of complete window.
Foregoing commands will save the screenshot at desktop. You can also save the screenshots in to clipboard. To do that you have to press one more button “Control” with the given commands. for example …
Use “Command+ control+ Shift+ 3″ instead of simple
“Command button +Shift+3″ command.
Apart from it mac os provide a software called “Grab” to capture the images in different styles. You can find this software in : Applications->utilities->Grab

Adding a new user account to Mac

System Prefs Icon

Adding a new user account to your computer

You can create individual user accounts for each person who uses your computer. Each new user has a separate home folder and can adjust his or her own preferences without affecting other users.
  1. Choose Apple menu > System Preferences and click Accounts.
  2. If some settings are dimmed, click the lock icon and type an administrator name and password.
  3. Click Add (+) and type the user’s name.
  4. If you don’t want to use the short name generated automatically, type a new short name. (Once the account is created, you won’t be able to change the short name.)
  5. Type the user’s password in the Password and Verify boxes.
  6. Type a hint to help the user remember the password if they have trouble remembering it at login.
  7. Click Parental Controls and select options to determine what the user can do with the computer.
If you change your mind while you’re creating a new user account, click Delete (-) to cancel.

How To Easily Share Files Between Mac & Windows Computers

File sharing between Macs and Windows is a little lob-sided. Out of the box, Macs can detect any Windows computer connected to the local network. It appears right on the Finder’s sidebar. So naturally, it is very easy for a Windows user to share their files with anyone on a Mac. The reverse process – allowing a Mac to share its files – requires a little more attention. The transition from Tiger to Leopard has made it a little bit more complicated for regular users to set up shared folders because the setting has been “disguised”.
In this week’s Macnifying OS X, I’m going to show you how easy it is to share files on your Mac so that it appears on Windows computers automatically.
how to share files between mac and pc


In System Preferences, go to ‘Sharing’ and check the box for ‘File Sharing’. By default, only your Public Folder will be shared. If you want to add other folders to the shared list, click on the ‘+’ sign under the Shared Folder box and choose the folders you wish to share.
After you’re done selecting, you’ll need to set the Permissions for each shared folder. Generally, you should allow Read Only rights to avoid others from messing around with your files. As you can see from the screenshot below, I removed the group labelled ‘Users’ from the users list so only ‘Everyone’ and I appear on the list. I do this to make things easier, only to allow guests logins from other computers.
share files between computers
Next, click on ‘Options’ and on the resulting window, check the box that says “Share files and folders using SMB” and hit ‘Done’.
share files mac windows
Now, you’ll need to add your Mac into a Microsoft workgroup. To do this, click ‘Show All’ at the top of the System Preferences windows and click on ‘Network’. Select your active connection and click ‘Advanced’.

In the window which pops up, click on the ‘WINS’ tab and enter a workgroup in the appropriate field. Microsoft has two workgroups: MSHOME and WORKGROUP. Find out which workgroup the majority of your Windows computers belong to and set the workgroup to that.
Click on ‘OK’ and you’ll return to Network preferences, now hit ‘Apply’. Now you’re halfway there – the rest of the work is performed on the Windows machines.

On your Windows desktop, right-click on ‘My Computer’ and select Properties. Click on the ‘Computer Name’ tab and make sure that your workgroup is the same as the one set on your Mac. If it isn’t then click on ‘Change’, set it and restart your computer.
Once that is done, double-click on ‘My Network Places’ and voila, all of your Mac’s shared folders should be visible. Take note that the Drop Box in your Mac’s Public folder won’t be accessible. If you want to use the Drop Box to let other users “drop” their files onto your Mac, you’ll need to change its permissions.
On your Mac’s Home folder, double-click the Public folder. Right-click on Drop Box and choose ‘Get Info’. Click on the lock icon on the bottom right hand corner of the Info window and enter your account password. Then set the permission for Everyone to Read & Write hence, allowing anyone to conveniently “drop” files onto your Mac.

Did you find this tutorial easy to follow? Did it work for you? Is there an easier way to share files between Mac and Windows computers?

Wednesday, April 27, 2011

Free Software for Mac os

Web Browsing

firefox

Mozilla Firefox

The premier free, open-source browser. Tabs, pop-up blocking, themes, and extensions. Considered by many to be the world's best browser.
Download Page

Video Player, Torrents, Podcasting

miro

Miro

Beautiful interface. Plays any video type (much more than quicktime). Subscribe to video RSS, download, and watch all in one. Torrent support. Search and download from YouTube and others.
Download Page

IM - Instant Messaging

adium

Adium

Connect to multiple IM accounts simultaneously in a single app, including: AOL IM, MSN, and Jabber. Beautiful, themable interface.
Download Page

Video Converter, iPhone Converter

video converter

Miro Video Converter

Convert any type of video to mp4 or theora. Convert any video for use with iPhone, iPod, Android, etc. Very clean, easy to use interface.
Download Page | Mac App Store (free)

Application Launching

quicksilver

Quicksilver

Quicksilver lets you start applications (and do just about everything) with a few quick taps of your fingers. Warning: start using Quicksilver and you won't be able to imagine using a Mac without it.
Download Page

Email

thunderbird

Mozilla Thunderbird

Powerful spam filtering, solid interface, and all the features you need.
Download Page

Utilities

The Unarchiver

The Unarchiver

Uncompress RAR, 7zip, tar, and bz2 files on your Mac. Many new Mac users will be puzzled the first time they download a RAR file. Do them a favor and download UnRarX for them!
Download Page

DVD Ripping

handbrake icon

Handbrake

DVD ripper and MPEG-4 / H.264 encoding. Very simple to use.
Download Page

RSS

vienna

Vienna

Very nice, native RSS client.
Download Page
rssowl

RSSOwl

Solid cross-platform RSS client.
Download Page

Peer-to-Peer Filesharing

cabos icon

Cabos

A simple, easy to use filesharing program. Gnutella network.
Download Page
solarseek

SolarSeek

Soulseek filesharing for Mac, in a simple, solid client.
Download Page
transmission icon


Transmission

Very nice torrent downloader.
Download Page

Running Windows Software on Macs

Q

Q Emulator

Run Windows programs on your Intel Mac at near native speed. Works on G4 / G5 Macs too, but much slower.
Download Page

Podcasting

juice

Juice

Solid podcasting client.
Download Page

Video Playback

VLC

VLC

Plays more video files than most players: Quicktime, AVI, DIVX, OGG, and more. Pretty good interface.
Download Page
MPlayer

MPlayer

The interface and buttons are not as nice or as Mac-like in feel, but it may play even more video files than VLC.
Download Page
MPlayer

Perian

A plugin that allows quicktime to play additional video formats. (Included in Democracy Player.)
Download Page

iPod Ripping

iPodDisk

iPodDisk

Copy music off your iPod in the finder, like a regular disk drive.
Download Page

CD / DVD Burning

handbrake icon

Burn

CD and DVD Burner. Burn any video to a disc that plays in your DVD player!
Download Page

Privacy

vidalia

Vidalia

This TOR frontend keeps you anonymous on the web using military-grade techniques. For use with Firefox see: TorButton.
Download Page

Word Processing / Office Suites

bean

Bean

Very fast and easy to use word processor. Live word count, autosaving, more.
Download Page
openoffice

OpenOffice

OpenOffice is a full-featured, office suite compatible with Microsoft Word, Powerpoint, and Excel. Friends don't let friends pay for Microsoft Office.
Download Page
abiword

AbiWord

A word processor. Leaner and quicker than OpenOffice. Compatible with Microsoft Word documents and OpenDocument Format.
Download Page

Wifi Scanning

kismac

KisMac

The best wireless scanner for Mac. Find wireless access when you're on the go.
Download Page

Sound Recording

audacity

Audacity

Simple sound recording tool.
Download Page

Graphics, Photo, Publishing

seashore

Seashore

Based on Gimp, but doesn't require X11.
Download Page
formulate pro

Formulate Pro

An easy way to fill-out (or sign) PDFs that Preview can't edit.
Download Page
Xee

Xee

Fast image viewer and image browser.
Download Page
gimp

Gimp.app

Photo editing application that rivals Photoshop in features (requires X11).
Download Page
inkscape

Inkscape

Vector graphics application (requires X11).
Download Page
scribus

Scribus

Desktop publishing. Complicated install, but a nice app.
Download Page

FTP / SFTP

cyberduck

Cyberduck

Very good all-around ftp program.
Download Page
onebutton ftp

OneButton FTP

Simple, fast FTP, with a focus on "advanced queuing".
Download Page
fugu

Fugu

Not as polished as Cyberduck (and only for SFTP) but has a side by side interface showing your files and the remote files.
Download Page

HTML / Text Editing

smultron

Smultron

Text / html editor. Integrates with Cyberduck for editing websites.
Download Page
NVU

Nvu

Visual tool for making websites (WYSIWYG html editor), comparable to Dreamweaver.
Download Page

IRC

colloquy

Colloquy

Great IRC client.
Download Page

Web Development

wavemaker.gif

WaveMaker

A visual development tool for building great-looking web and cloud applications.
Download Page

Note Taking

freemind

Freemind

An innovative application for note taking and outlining. Takes time to get used to, but some people swear by it.
Download Page

Personal Finance

cashbox

Cashbox

Simple, easy to use application for managing personal finances.
Download Page
buddi

Buddi

A personal finance and budgeting program, aimed at those who have little or no financial background.
Download Page

MSN Chat

More Web Browsing

shiira

Shiira

Fast, nice web browser.
Download Page
sunrise browser

SunriseBrowser

Good webkit-based browser created with special tools for web designers.
Download Page
seamonkey

Seamonkey

Full-featured Mozilla browser, used to be called 'Mozilla Suite'.
Download Page

PDF Viewer

skim

Skim

PDF viewer.
Download Page

Screensaver

electric sheep

Electric Sheep

Immersive, trippy screensaver.
Download Page

More Filesharing

bittorrent

Tomato Torrent

Download torrents. Nice and simple.
Download Page
Also see: Poisoned - Azureus

3D Graphics and Modeling

blender

Blender

Powerful 3D Modeling software.
Download Page

Planetariums and Outer Space

celestia icon

Celestia

Open-source 3D planetarium software. Akin to traveling through space (outer space).
Download Page
stellarium icon

Stellarium

"Renders realistic skys in realtime." See what you would see if your city wasn't so light-polluted. Used in real planetariums.
Download Page
Also see: macORSA - Orbit Reconstruction, Simulation, and Analysis

Comic Viewer

jomic

Jomic

Read digital comics.
Download Page

Dance Dance Revolution

stepmania

Stepmania

Dance Dance Revolution clone. Can connect to external dance pads.
Download Page

Games

cube icon

Cube

Nice first-person shooter.
Download Page
Marathon: Aleph One icon

Marathon: Aleph One

Engine for Bungie's free FPS series Marathon. Play online, solo play with rich original story, many total conversions and thousands of maps.
Download Page
zombies icon

Zombies

3D zombie strategy game.
Download Page
armagetron

Armagetron Advanced

3D Tron game.
Download Page
BZflage logo

BZFlag

First-person tank game.
Download Page
Battle for Wesnoth logo

Battle for Wesnoth

Fantasy / Strategy Game
Download Page
Also see: Snes9X (SNES emulator), Frozen Bubble, PySol for Mac (card games), PLANESHIFT (3D Fantasy MMORPG), VDrift (drift racing simulation).

del.icio.us Client

cocoalicious

Cocoalicious

Let's you easily post to del.icio.us.
Download Page

Free File Hosting

CC Publisher

CC Publisher

Host Creative Commons video or audio files for free on archive.org with this easy uploader.
Download Page

Quick Links


Viewers Comic viewer: Comical
Comic viewer: FFView
OpenDocument viewing application: ODF Viewer

RSS and Usenet
RSS Reader: Feed
Cross-platform RSS reader: BlogBridge
RSS video podcast player: I/ON
Usenet Reader: OSXnews

IM, IRC, Chat
Multi-IM: Fire
Powerful IRC client: X-Chat Aqua
Videoconferencing client: XMeeting
PBX / Voip system: Asterisk

Graphics and Art
Draw on a moving canvas: Cosmic Painter
Image editor: Seashore
An artwork scaling calculator: Scaletron!
A Paint-like program designed for pixel-pushers: Pixen
A VRML/X3D Browser: FreeWRL
Video
Realtime Editing and Effects System: Jahshaka
Video transcoder: ffmpegX
MPEG convertor: MPEG Streamclip

Music and Audio
OGG Vorbis encoder (ogg is an open source audio codec): Ogg Drop
Music notation: LilyPond
Play and compose live music: Miraton
Max/MSP style realtime music and multimedia environment: Pd
Manage chords, lyrics, and projection: OpenSong

Wifi / Networking
Discover open wifi networks: iStumbler
A Prism/Prism2 driver 802.11: WirelessDriver
Fast, lightweight VNC client: Chicken of the VNC
VNC server providing remote access to the GUI, keyboard and mouse: OSXvnc

Utilities
Manage disk space: DiskInventoryX
Book management: Books
CD / DVD Burning: SimplyBurns
Disable sleep on a Mac: InsomniaX
Protect your laptop with a car-alarm style alarm: Multialarm
Remove extra languages from OSX to save disk space: Monolingual
System event notifications: Growl
System performance monitors: MenuMeters
Virtual desktop tool: Desktop Manager
Virus checker: ClamXav
Share mouse and keyboard between 2 or more computers: SynergyKM and Quick Synergy
Check available RAM: Memtest
Monitor CPU, RAM, battery, CPU temp, network, I/O, and more: X Resource Graph
Control your Mac via Bluetooth: Romeo

Writing and Typesetting
Screenplay writing and pre-production support: Celtx
Bibliography manager, BibTeX .bib format: BibDesk
Typesetting - TeX previewer for Mac OS X: TeXShop
Typesetting: iTexMac

Education
Education course management system: Moodle
Student information system: Focus / SIS
Another student information system: Centre

Programming
Development platform: Eclipse
SQL Editor: YourSQL

Math and Engineering
General purpose computer algebra system: Yacas
GNU S language: R
MATLAB style rapid engineering and scientific prototyping / data processing: FreeMat