Showing posts with label ipod. Show all posts

Friday, February 13, 2015

Using Custom fonts in your iOS application

I have found that there are quite a few postings out there about how to use custom fonts in your application.  It is unfortunate that I didn’t find  a single one that actually helped me use a custom font.  Most of them echoed each other and gave misleading or erroneous advice.  Because of this I am going to post how to actually use a custom font in your app.
First, you must be aware that custom fonts are added on a per-application basis.  You can not add a font to your iOS device and have it be available for all of your applications.
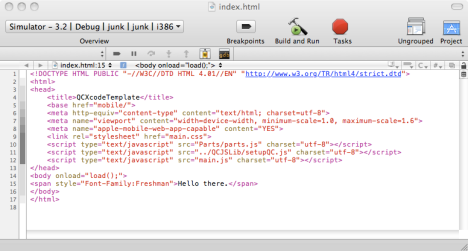
Second, no code needs to be added in order for you to use the custom font or fonts in a QuickConnectFamily hybrid iOS application or any other application that uses the UIWebView.
Third, no @font-face CSS call is needed in your application.
Fourth, this example will show two custom fonts being added and used.  The first is the Freshman font, the second is the PF Handbook Pro Normal font.  Both of these are available as ttf files.
OK.  So here is how we do it.
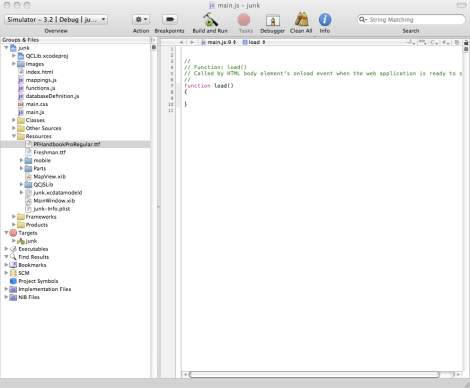
  1. Drag your ttf files into the Resources group of your project selecting the copy checkbox.
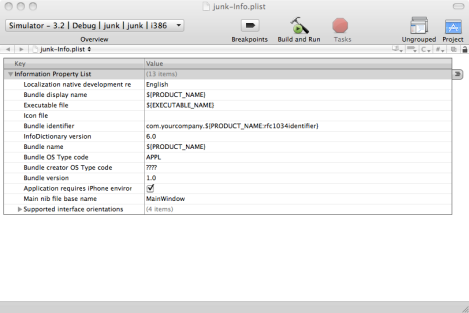
  2. Open your applications’ info.plist found in the Resources group.
  3. Control-click on any of the properties and select New
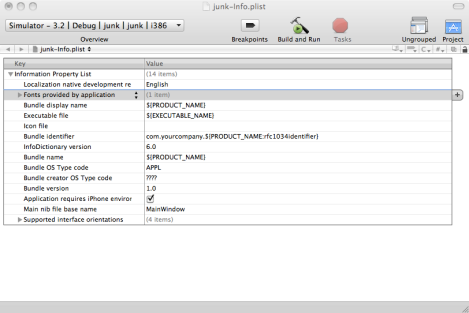
  4. Select ‘fonts provided by application’
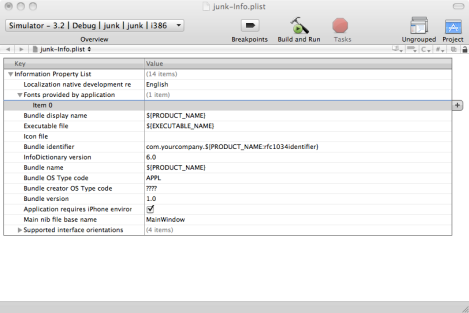
  5. Expand the resource just created by clicking the triangle button on the left of the description
  6. Enter Freshman.ttf in the Value column (You would put the name of your font file here)
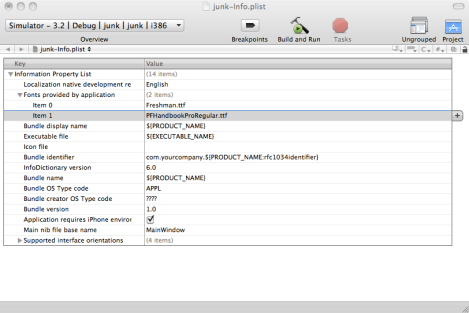
  7. Control-click the Freshman.ttf row and select Add Row
  8. Enter PFHandbookProRegular.ttf in the Value column(You would put the name of another font you want to use here)
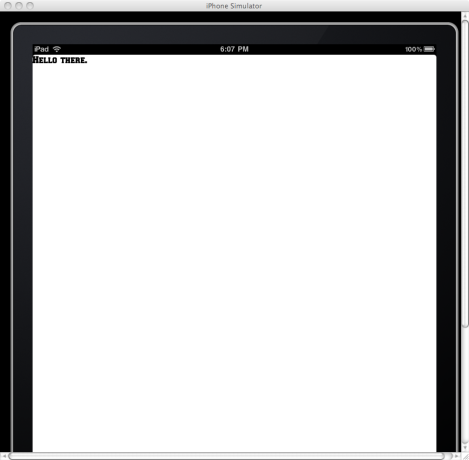
  9. Use the font in your CSS or directly in an inline style.  Both now work.
Hopefully this will clear things up regarding using custom fonts.

Thursday, February 12, 2015

How to change Status Bar text color in iOS 7

  1. Set the UIViewControllerBasedStatusBarAppearance to YES in the .plist file.
  2. In the viewDidLoad do a [self setNeedsStatusBarAppearanceUpdate];
  3. Add the following method:
    -(UIStatusBarStyle)preferredStatusBarStyle{ 
        return UIStatusBarStyleLightContent; 
    }

Wednesday, June 8, 2011

Adding a UIButton Programatically

You might know how to add a button via IB – here is a code sample of how to do that using code

UIButton *btn = [UIButton buttonWithType:UIButtonTypeRoundedRect];
[btn addTarget:self action:@selector(btnClick:) forControlEvents:UIControlEventTouchDown];
[btn setTitle:@"SKIP" forState:UIControlStateNormal];
btn.frame = CGRectMake(0, 100, 320, 50);
[self.view addSubview:btn];

and if you want to add a background image


UIImage *someImage = [UIImage imageNamed:@"splashImage.png"];
[btn setBackgroundImage:someImage forState:UIControlStateNormal];

Monday, May 30, 2011

How To Stop iTunes Automatically Syncing Your iPhone, iPod or iPad

iTunes Auto Sync Slowing You Down?

If you’re wondering how you can stop iTunes from automatically kicking off the sync + backup + update process when you plug your iOS device in then look no further.

By holding down the Shift + Control keys (Windows) or Command + Option keys (Mac) and then plugging your iPad, iPhone or iPod into your USB port you will tell iTunes not to sync!

If you happen to miss it and sync kicks off anyway, either slide the unlock slider on your device or hit the eject symbol in iTunes and your device will gracefully stop syncing and disconnect.

This was tested using both an iPad 2 and an iPhone 3GS on iTunes 10.2 (Mac).

Wednesday, May 25, 2011

iOS - File Sharing


File Sharing requires

  • The latest version of iTunes
  • Mac OS X v10.5.8 or later or an up-to-date version of Windows XP, Windows Vista, or Windows 7
  • An iOS device (with the latest version of iOS)
  • An iOS application that supports File Sharing

How to copy files using File Sharing

  1. Connect your iOS device to your computer using the included Dock Connector to USB cable.
  2. Launch iTunes 9.1 or later on your computer.
  3. Select your iOS device from the Devices section of iTunes.

    iTunes Devices section
  4. Click the Apps tab and scroll down to the bottom of the page.

    Note: If you do not see the File Sharing section shown in the image below, your iOS device does not have any apps that support File Sharing.

    iTunes File Sharing tab
  5. Under the File Sharing section, you'll find a list of apps currently installed on your iOS device that support File Sharing. Select an app to view a list of the files associated with that app on your iOS device.


    iTunes apps and documents list

How to copy files from your computer to your iOS app

  1. Be sure to select the appropriate application in the Apps list under File Sharing.
  2. Drag and drop files onto the Documents list to copy them to the app on your iOS device or…
  3. Click the Add… button, locate the file or files you want to copy from your computer, and click Choose. The selected files will be copied to the app on your iOS device immediately. Select only files that are supported by the iOS device app. Refer to the iOS app’s documentation to determine which file formats it supports.

    Copy to iPad dialog

How to copy files from an iOS app to your computer

  1. Be sure to select the appropriate application in the Apps list under File Sharing.
  2. Drag and drop files from the Documents list to a folder or window on your computer to copy them to your computer, or…
  3. Select the file or files you want to copy to your computer from the Documents list and click the "Save to…" button. Select only files that are supported by the iOS app. Refer to the iOS app’s documentation to determine which file formats it supports. Locate the folder on your computer to which you want to copy the files and click the Choose button. The selected files will be copied to the selected folder on your computer immediately.

    Copy to computer from iPad


Additional Information

How does File Sharing work?

File Sharing enables you to copy files from your computer to apps on your iOS device and from those apps to your computer. Not all iOS apps support File Sharing. Using File Sharing, files are copied into an iOS app and can only be opened from within that app if the app supports it. Refer to the documentation that came with the iOS app to determine supported file formats, and how to interact with shared documents.


Will I lose the files shared to an application if I delete that app from my iOS device?

Yes. Deleting an app on your iOS device with shared files will also delete the files on the iOS device associated with it. To avoid losing shared files on your iOS device associated with the app, back up and copy shared files to your computer frequently, and especially prior to deleting the application from your iOS device.

How do I back up shared files?

iTunes will back up the shared files on your iOS device when it syncs your iOS device with your computer. You cannot select and restore specific files from a backup, so be sure to copy files you have created on your iOS device frequently to a folder on your computer.

Where do I find files copied to apps on my iOS device?

The files you copy from your computer are only accessible from within the app on the iOS device to which you have copied the file. They are not accessible from other apps or locations on your iOS device. You can view the list of files under the File Sharing section of the Apps tab in iTunes when your iOS device is connected to your computer. See "How to copy files using File Sharing," above.


How do I delete files I copied to an app on my iOS device?

To delete a file you copied to an iOS device app using File Sharing:

  1. Attach your iOS device to your computer.
  2. Select your iOS device in the Devices section of iTunes.
  3. Click the Apps tab, then scroll down to the File Sharing section.
  4. Select the application from which you would like to delete a specific file.
  5. Select the file from the Documents list and press the Delete key on your keyboard.
  6. When prompted to confirm your request, click Delete.

    Delete confirmation window
  7. The file will be deleted from the app on your iOS device immediately.

Some applications may also support additional methods for deleting files. Refer to your application's documentation for further information.


How to Find Your iPhone’s Unique Identifier (UDID)


What is the UDID?


Each iPhone or iPod Touch has a Unique Device Identifier (UDID),
which is a sequence of 40 letters and numbers that is specific to your
device. It’s like a serial number but much harder to guess. It
will look something like this:
2b6f0cc904d137be2e1730235f5664094b831186.


Why do we need the UDID?


Your iPhone can only install programs that are approved by Apple.
Applications in the App Store have been approved by Apple for general
distribution, but beta customers get to try the app before it’s in the
store. We register your UDID with Apple so they can approve our
application especially for your iPhone.


How do I get my UDID?


You can copy/paste your UDID from iTunes or email it directly from
your device by using a free app from the App Store.


Email Using the Free App


Install and run
Ad Hoc Helper.
It will create an email with your UDID. Send it to nobody@example.com.


Copy/Paste from iTunes


  1. Launch iTunes and connect your iPhone.
  2. In the right pane, locate the information about your iPhone,
    including its name, capacity, software version, serial number, and
    phone number.

    Plugged-in-iphone
  3. Reveal the Identifier by clicking on Serial Number:.

    Clicked-serial-number
  4. Copy the Identifier to your clipboard by choosing EditCopy.
    Edit-copy
  5. Paste the Identifier into an email to nobody@example.com
    (You should be able to paste into your mail program or web browser by
    selecting EditPaste).

Thursday, May 5, 2011

Reading and Writing plists

Reading a plist file from the application bundle just requires a few lines of code, and some error handling. I like to place that code in a nice convenience method like this:
 

- (id)readPlist:(NSString *)fileName {
   NSData *plistData;
   NSString *error;
   NSPropertyListFormat format;
   id plist;

   NSString *localizedPath = [[NSBundle mainBundle] pathForResource:fileName ofType:@"plist"];
   plistData = [NSData dataWithContentsOfFile:localizedPath];
   plist = [NSPropertyListSerialization propertyListFromData:plistData mutabilityOption:NSPropertyListImmutable format:&format errorDescription:&error];
   if (!plist) {
      NSLog(@"Error reading plist from file '%s', error = '%s'", [localizedPath UTF8String], [error UTF8String]);
      [error release];
   }

   return plist;
}

I’m not too fond of using id as return values or parameters to methods. I prefer stronger type checks, so I typically wrap the readPlist method in two methods that return either an array or a dictionary.


- (NSArray *)getArray:(NSString *)fileName {
   return (NSArray *)[self readPlist:fileName];
}

- (NSDictionary *)getDictionary:(NSString *)fileName {
   return (NSDictionary *)[self readPlist:fileName];
}

Writing to a plist file is not much more difficult:

- (void)writePlist:(id)plist fileName:(NSString *)fileName {
   NSData *xmlData;
   NSString *error;

   NSString *localizedPath = [[NSBundle mainBundle] pathForResource:fileName ofType:@"plist"];
   xmlData = [NSPropertyListSerialization dataFromPropertyList:plist format:NSPropertyListXMLFormat_v1_0 errorDescription:&error];
   if (xmlData) {
      [xmlData writeToFile:localizedPath atomically:YES];
   } else {
      NSLog(@"Error writing plist to file '%s', error = '%s'", [localizedPath UTF8String], [error UTF8String]);
      [error release];
   }
}


Creating a New Navigation-Based Application

Open Up Xcode


You will be doing all of your development in Xcode. Then close the Welcome window (if it shows up)
Start a new iPhone OS Project
Click Xcode > New Project and a window should pop up like this:


Make sure Application is selected under iPhone OS and then select Navigation-Based Application. Click Choose… It will ask you to name your project.  Type in “Hello World” and let’s get started.

iPhone Programming Tutorial – UITableView Hello World

In this tutorial I will walk to you through creating a simple “Hello World” application using a UITableView for the iPhone.  There are many ways that a Hello World program could be made on the iPhone, I am going to show you the simplest.  This tutorial assumes you have a basic understanding of Objective-C.  Apple has provided a very simple and straight forward tutorial on Objective-C.  You can find it here.
You will learn how to:
This tutorial assumes that you have already installed the iPhone SDK.  If you are unsure how to do this, click and follow the steps.

Debugging Tutorial – Automating Your Tests With A UIRecorder Instrument

If you have ever experienced a bug in your application that took many steps to reproduce, then this tutorial is for you.  By nature, testing and debugging are very tedious processes.  This is especially the case for the iPhone.
Say you have an app that drills down 5-levels deep to some other view.  Now let’s say that you have a bug on that view 5 levels deep.  Your normal method of debugging is:
  • Run the app
  • Tap view 1
  • Tap view 2
  • Tap view 3
  • Tap view 4
  • Tap view 5
  • (Crash)
  • Change some code
  • Repeat
As you can see (and I’m sure have noticed), this sucks.  Well, Kendall Gelner gave a killer talk at 360iDev (which I recently attended) on various debugging tips using Instruments and XCode.  One of the most useful techniques (to me) was how to automate your testing.  Let me show you what I mean.

1. Open up the app you wish to test/debug
2. Launch it in the simulator
3. Open Instruments – This is located in /Developer/Applications/Instruments (just do a spotlight search for it)

screenshot_01

4. Select UIRecorder and click Choose - You should now see a window like this

screenshot_02

5. Now, we need to attach this tool to the iPhone Simulator process.  Click the drop-down above  

Default Target -> Attach to Process -> iPhone Simulator.


ss_03

6. Now click Drive & Record and do all of the steps in the simulator to test your app.  At this point, the UI Recorder is recording your every move.  When you have finished press the Stop button. Note: After you have recorded your actions, don’t move the simulator as it will mess up the entire process.
7. Modify your code…
8. Press the Drive & Record button and watch the magic happen.  The test is automatically done for you.  You should see your mouse move over to the simulator and the system mimicking every action that you did before.
That’s it! I know this isn’t a super long tutorial (or even a coding tutorial), but the UI Recorder has sped my test time up tremendously.  Give it a shot and let me know what you think.  Here is a short video of me going through all of the steps.

video tutorial

simple Navigationbased tutorial

It’s time to start displaying some drinks. You’ll need to make some modifications to both the RootViewController.h and RootViewController.m files

1Declare the drinks array.(in RootViewController.h )

@interface RootViewController : UITableViewController{
NSMutableArray* drinks;
}
@property (nonatomic, retain) NSMutableArray* drinks;
@end
(RootViewController.m)

@synthesize drinks;
-(void)dealloc{

[drinks release];

[super dealloc];

}

2 Implement and populate the array.(in RootViewController.m)
In RootViewController.m, uncomment and expand the ViewDidLoad methods.
Tell the table how many rows you have.
Populate the table cells.

- (void)viewDidLoad { [super viewDidLoad];
RootViewController.m
NSMutableArray* tmpArray = [[NSMutableArray alloc]

initWithObjects:@”Firecracker”, @”Lemon Drop”, @”Mojito”,nil];
self.drinks = tmpArray; [tmpArray release];
// Uncomment the following line to display an Edit button in

//the navigation bar for this view controller.
// self.navigationItem.rightBarButtonItem = self. editButtonItem;
}


3 Tell the table how many rows you have.

//Customize the number of rows in the table view.
- (NSInteger)tableView:(UITableView *)tableView numberOfRowsInSection:(NSInteger)section{
return [self.drinks count];
 
4 Populate the table cells

// Configure the cell.
cell.textLabel.text = [self.drinks objectAtIndex:indexPath.row];

return cell;
}
 
Now you’re ready to go. Save it, build and run, and you’ll see the three drinks in your app in the main view.

ScrollView example for TextField in iPhone

In the application when user input in the textfield then see UITextField is hidden under the keyboard.This problem solved using the ScrollView. So let see how it will be worked.
In this application we will see how to ScrollView worked in our application. This is the very simple application. In the application when user input in the textfield then see UITextField is hidden under the keyboard.This problem solved using the ScrollView. So let see how it will be worked.

Step 1: Create a View base application using the template. Give the application name “ScrollViewExample”.

Step 2: Xcode automatically creates the directory structure and adds essential frameworks to it. You can explore the directory structure to check out the content of the directory.

Step 3: Expand classes and notice Interface Builder created the ScrollViewExampleViewController class for you. Expand Resources and notice the template generated a separate nib, ScrollViewExampleViewController.xib, for the “ScrollViewExample”.

Step 4: Open the ScrollViewExampleViewController.h file, we have added scrollview for scrolling the view,and two textfield for display the textbox. So make the following changes in the file:

#import
@interface ScrollViewExampleViewController : UIViewController {

IBOutlet UIScrollView *scrollview;
IBOutlet UITextField *textField1;
IBOutlet UITextField *textField2;

BOOL displayKeyboard;
CGPoint  offset;
UITextField *Field;
}

@property(nonatomic,retain) IBOutlet UIScrollView *scrollview;
@property(nonatomic,retain) IBOutlet UITextField *textField1;
@property(nonatomic,retain) IBOutlet UITextField *textField2;
 

Step 5: Double click your ScrollViewExampleViewController.xib file open it to the Interface Builder. First drag Scroll View from the library and place it to the view window and drag two TextField also, place it to the view window(See the figure below).Connect the File’s Owner icon to the View icon and select view. Select File’s Owner icon to the view and select scrollview. Next drag from the File’s Owner icon to the first textfield and select textfield1, do it once more time for the textfield2. Now save it, close it and go back to the Xcode.


Step 6: In the ScrollViewExampleViewController.m file make the following changes:

- (void) viewWillAppear:(BOOL)animated {
[super viewWillAppear:animated];

[[NSNotificationCenter defaultCenter]
addObserver:self
selector:@selector
(keyboardDidShow:)
name: UIKeyboardDidShowNotification
object:nil];
[[NSNotificationCenter defaultCenter]
addObserver:self
selector:@selector
(keyboardDidHide:) name:
UIKeyboardDidHideNotification
object:nil];

scrollview.contentSize = CGSizeMake(SCROLLVIEW_CONTENT_WIDTH,
SCROLLVIEW_CONTENT_HEIGHT);
displayKeyboard = NO;
}

-(void) viewWillDisappear:(BOOL)animated {
[[NSNotificationCenter defaultCenter]
removeObserver:self];
}

-(void) keyboardDidShow: (NSNotification *)notif {
if (displayKeyboard) {
return;
}

NSDictionary* info = [notif userInfo];
NSValue* aValue = [info objectForKey:UIKeyboardBoundsUserInfoKey];
CGSize keyboardSize = [aValue CGRectValue].size;

offset = scrollview.contentOffset;

CGRect viewFrame = scrollview.frame;
viewFrame.size.height -= keyboardSize.height;
scrollview.frame = viewFrame;

CGRect textFieldRect = [Field frame];
textFieldRect.origin.y += 10;
[scrollview scrollRectToVisible: textFieldRect animated:YES];
displayKeyboard = YES;
}

-(void) keyboardDidHide: (NSNotification *)notif {
if (!displayKeyboard) {
return;
}

scrollview.frame = 
CGRectMake(0, 0, SCROLLVIEW_CONTENT_WIDTH, SCROLLVIEW_CONTENT_HEIGHT);

scrollview.contentOffset =offset;

displayKeyboard = NO;

}

-(BOOL) textFieldShouldBeginEditing:(UITextField*)textField {
Field = textField;
return YES;
}

- (BOOL)textFieldShouldReturn:(UITextField *)textField
{
[textField resignFirstResponder];
return YES;
}
Step 7: Now compile and run the application in the Simulator.


Download Updated SourceCode ScrollViewExample 2

Creating Digital Mockups For Your Apps


While conceptualizing your App, the first things you need to create is a flow chart of how your App will behave and some reference templates and images that will show you how each screen will look in your App. Here are some tools to help you do this.
While conceptualizing your App, the first things you need to create is a flow chart of how your App will behave and some reference templates and images that will show you how each screen will look in your App.

The first step to doing this is to get hold of a pencil and paper and make some rough sketches. Start by making a list of all the possible screens your app will have and then actually listing the functionality each screen will have. Once you have that, you can proceed to make some dummy mockup sketches. At this point you should focus on the “placement” elements of each screen… that is decide, what goes where. Next you can start to imagine the design elements and look and feel of each screen – and how they will all look similar and connect to one another. A flow chart showing how the connect up – will help. I suggest you get hold of a spiral bound sketch book and not lose sheets of paper, that can easily get misplaced. Any writing pad will also do.

To help you make your hard copy and soft copy drawings, these downloadable documents and plans will help you. They will be useful when you are brainstorming or trying to find the perfect flow for your app and putting the visual elements together.
  • Mock App – Templates for Keynote and Powerpoint
  • Yahoo Design Stencils – Yahoo! Design Stencil Kit version 1.0 is available for OmniGraffle, Visio (XML), Adobe Illustrator (PDF and SVG), and Adobe Photoshop (PNG)
Download each of the above packs and files as they are all must have tools when you or your graphic artist are planning the User Interface or graphic design of your Apps.

Playing Video file in Iphone


Let’s start by looking at a short video of the application. The basic idea to make this work is simple, your video content viewable in your simulator.
Step 1: Create a new project from Xcode using View-base application.
Step 2: We need to add some code in the header file.
#import <MediaPlayer/MediaPlayer.h>

#import <UIKit/UIKit.h>
@interface Tabbar1ViewController : UIViewController
{
MPMoviePlayerController *moviePlayer;
NSURL *movieURL;
}
Step 3: Now you add MediaPlayer.framework in your framework folder.Only shows up in the iPhone SDK frameworks folder, at  /Developer/platforms/iPhoneOS.platform/Developer/SDKs/iPhoneOS2.0.sdk/System/Library/Frameworks.


Step 4: In the controller file, we create the path to the movie, setup the movie player, register to receive a notification when the movie has finished playing, start the movie.

- (void) moviePlayBackDidFinish:(NSNotification*)notification 
{       
[[NSNotificationCenter defaultCenter] removeObserver:self
name:NULL
object:nil];
[movieURL release];
[moviePlayer release];
}

-(void)viewWillAppear:(BOOL)animated
{
NSString *path = [[NSBundle mainBundle] pathForResource:@"video" 
    ofType:@"mov"];      
movieURL = [NSURL fileURLWithPath:path];

moviePlayer = [[MPMoviePlayerController alloc] initWithContentURL:movieURL];
[moviePlayer setMovieControlMode:MPMovieControlModeHidden];  

[[NSNotificationCenter defaultCenter] addObserver:self 
selector:@selector(moviePlayBackDidFinish:) 
name:MPMoviePlayerPlaybackDidFinishNotification 
object:nil];

[moviePlayer play];
}
 
Step 5: Now compile and run your application on the simulator

iPhone SDK Tip: Firing custom events when a link is clicked in a UIWebView

Well I have been asked this a few times and I can see how it would be a very helpful addition to theUIWebView’s feature set. What I am talking about is adding the ability to intercept the event generated when a user selects a link in a webpage being displayed with a UIWebView, this will then allow you to perform any action that you want.
When would you use this I hear you say? Well one person asked me if I knew how to append the users current location onto all HTTP requests? and another just wanted to know how to perform custom actions from an embedded UIWebView.

Once again I will be extending the “Build your very own Web Browser!”, if you haven’t already completed it then I suggest that you head over there now and spend 5 minutes reading it and then downloading the project files at the end.
Start by opening up the WebBrowserTutorialAppDelegate.h file and editing the @interface line to read:

@interface WebBrowserTutorialAppDelegate : NSObject  {
 
What we have done is to make the main AppDelegate a delegate for the UIWebView as well.
Now we need to set our webView to have the main AppDelegate as its delegate, you can do this by opening up WebBrowserTutorialAppDelegate.m and putting the following line just inside theapplicationDidFinishLaunching function:

webView.delegate = self;


That is all pretty self explanatory, it just sets the delegate of our webView to self, which in this case is our main application delegate.
Now we are pretty much done, we just need to add the function to catch the link clicks. To do this we need to add a new function, copy the content below to the WebBrowserTutorialAppDelegate.m file:

- (BOOL)webView:(UIWebView*)webView 
shouldStartLoadWithRequest:(NSURLRequest*)request 
navigationType:(UIWebViewNavigationType)navigationType {
NSURL *url = request.URL;
NSString *urlString = url.absoluteString;
NSLog(urlString);
return YES;
}
 
This function will catch all requests and allow you to either manipulate them and pass them on or to perform your own custom action and stop the event from bubbling.
The first line gets the URL of the request, this is the contents inside the href attribute in the anchor tag.
The next line converts the URL to a string so we can log it out. You can access many parts of the NSURL, here are some of them and brief description of what they do.

absoluteString – An absolute string for the URL. Creating by resolving the receiver’s string against its base.
absoluteURL – An absolute URL that refers to the same resource as the receiver. If the receiver is already absolute, returns self.
baseURL – The base URL of the receiver. If the receiver is an absolute URL, returns nil.
host – The host of the URL.
parameterString – The parameter string of the URL.
password – The password of the URL (i.e. http://user:pass@www.test.com would return pass)
path – Returns the path of a URL.
port – The port number of the URL.
query – The query string of the URL.
relativePath – The relative path of the URL without resolving against the base URL. If the receiver is an absolute URL, this method returns the same value as path.
relativeString – string representation of the relative portion of the URL. If the receiver is an absolute URL this method returns the same value as absoluteString.
scheme – The resource specifier of the URL (i.e. http, https, file, ftp, etc).
user – The user portion of the URL.

Then the third line simply logs the URL to the console, so you will new to open up the console while you run this in the simulator to see the results.
Finally the forth line returns YES, this will allow the UIWebView to follow the link, if you would just like to catch a link and stop the UIWebView from following it then simply return NO.

How to Dismiss the Keyboard when using a UITextView

The short answer is to send the UITextViewController the “resignFirstResponder” message … the trick however is when to send the message. In my case, and I assume it would be the same for others, is to listen for any changes to the text in the UITextView and if the carridge return character ‘\n’ is detected then send the “resignFirstResponder” message to the UITextView.
Step 1. The first step is to make sure that you declare support for the UITextViewDelegate protocol. This is done in your header file, as example here is the header called EditorController.h:
@interface EditorController : UIViewController  {
UITextView *messageTextView;
}
 
@property (nonatomic, retain) UITextView *messageTextView;
 
@end
Step 2. Next you will need to register the controller as the UITextView’s delegate. Continuing from the example above, here is how I have initialize the UITextView with EditorController as the delegate …
- (id) init {
if (self = [super init]) {
// define the area and location for the UITextView
CGRect tfFrame = CGRectMake(10, 10, 300, 100);
messageTextView = [[UITextView alloc] initWithFrame:tfFrame];
// make sure that it is editable
messageTextView.editable = YES;
 
// add the controller as the delegate
messageTextView.delegate = self;
}
Step 3. And now the final piece of the puzzle is to take action in response to the “shouldCahngeTextInRange” message as follows:
- (BOOL)textView:(UITextView *)textView shouldChangeTextInRange:(NSRange)range
replacementText:(NSString *)text
{
// Any new character added is passed in as the "text" parameter
if ([text isEqualToString:@"\n"]) {
// Be sure to test for equality using the "isEqualToString" message
[textView resignFirstResponder];
 
// Return FALSE so that the final '\n' character doesn't get added
return FALSE;
}
// For any other character return TRUE so that the text gets added to the view
return TRUE;
}

iPhone On-Screen Keyboard Rundown

As I started building the latest Consumetrics iPhone app over the weekend, I had to choose which keyboard style to use for some input fields like name, email, and so on. These fields live in a “settings table” (really just a grouped table with input fields on it), so picking keyboards in Interface Builder is out of the question, unfortunately, since I require some pretty customized cells. Naturally, I checked the documentation first, where I was confronted by this plethora of options:
typedef enum {
UIKeyboardTypeDefault,
UIKeyboardTypeASCIICapable,
UIKeyboardTypeNumbersAndPunctuation,
UIKeyboardTypeURL,
UIKeyboardTypeNumberPad,
UIKeyboardTypePhonePad,
UIKeyboardTypeNamePhonePad,
UIKeyboardTypeEmailAddress,
UIKeyboardTypeAlphabet = UIKeyboardTypeASCIICapable
} UIKeyboardType;
Good grief. Seven distinct keyboard types? Bah. (Yes, 9 appear in the list, but UIKeyboardTypeDefault and UIKeyboardTypeAlphabet are just aliases for other types. Quiet you.) Some choices were obvious — my email address field will probably use UIKeyboardTypeEmailAddress, for instance — but some other choices are kind of head-scratchers. One of the fields wants a quantity, for example. Which keyboard should I use for that bad boy? UIKeyboardTypeNumberPad? But what if I need units, like “cups”? Can I get an alphabetic keyboard from UIKeyboardTypeNumberPad? I didn’t know, and tragically neither does Google; there aren’t any good breakdowns of iPhone keyboard types on the first few pages. Hitting up some blogs finally pointed me to some more Apple documentation, but even that still didn’t answer all my questions.
After not finding what I need, I did what any good developer would do: put down what I was supposed to be doing, and pick up something more interesting. I slapped together a quick iPhone app to display each keyboard type through a table view, the source for which is attached, and used it to scribble down a quick reference, which follows forthwith:
Overview


This rundown contains images of all keyboard views for all keyboard types. Each keyboard is configured exactly the same with respect to things like which “Return” button they use, so any difference you see is due purely to differences in the keyboards themselves, and not their configuration. Bearing this in mind, it turns out there are only two real keyboard layout types: the “normal” alphabet keyboard layout, and the number pad layout:
normal alphabet keyboard layout number pad keyboard layout
The first thing to realize is that even though it looks like there are seven different keyboards, there really aren’t. There are really just 2 different keyboard layouts with different keys stuck on them, and the layouts are strung together in different ways. (The alphabet keyboard does have a couple varieties with more or fewer keys, but they’re really just variations on a theme.) The particularly observant reader (or maybe just the ones who are breathing, it is blue after all) will notice one particular difference between these keyboard layouts: the “Done” button. We’ll chat more about that in a bit.
UIKeyboardTypeASCIICapable and Friend
This keyboard has three different views: alphabet, punctuation and numbers, and punctuation and symbols.
normal alphabet keyboard layout alphabet keyboard layout with numbers and punctuation alphabet keyboard layout with symbols
You alternate between the three views by pushing the “ABC,” “123,” and “#+=” buttons on each view, which is as intuitive as we’ve come to expect from Apple. This keyboard has a total of 98 characters (26 lowercase + 26 uppercase + 1 spacebar + 10 numbers + 35 punctuation), so “ASCII capable” is a great name for this keyboard, and it should serve almost any enter-text-onto-your-iPhone need that you have. (And between you and me, if you push and hold some characters, you get a list of other characters to enter, so you can actually type a lot more than 98 characters on this keyboard, just less conveniently. I should note that this tap-and-hold input method works on all keyboards, not just UIKeyboardTypeASCIICapable.)
tap-and-hold diacritic example
The next keyboard type in the list, UIKeyboardTypeNumbersAndPunctuation, is exactly the same as this keyboard, it just opens on the second (numbers) view instead of the first (alphabet) view.
As a rule, this keyboard type should be your bread-and-butter keyboard. If you don’t know which keyboard to use, use this guy; he won’t let you down. There’s nothing text-wise you can do with an on-screen iPhone keyboard you can’t do with UIKeyboardTypeASCIICapable. (If your input is number-oriented as opposed to alphabet-oriented, though, you should probably use UIKeyboardTypeNumbersAndPunctuation.)
The only real drawback to this keyboard is that it’s clunky, with three screens to navigate, doesn’t provide any really input sanitization, so your user can enter almost any character he can think of, even if it doesn’t make sense in the context of the input. What keyboard should you use to provide input-level sanitization? Like sanitization for a URL, for example?
UIKeyboardTypeURL
I’m glad you asked! UIKeyboardTypeURL is designed specifically for the purpose of inputting the most common URLs quickly and efficiently:
URL alphabet keyboard layout URL number and punctuation keyboard layout URL number and symbol keyboard layout
This keyboard is basically the UIKeyboardTypeASCIICapable keyboard with the non-URL keys removed, and the spacebar replaced with some URL-handy keys. This keyboard is ideal for entering web addresses, like http://www.sigpwned.com/. Otherwise, not much else to say here. The take-home message is just that input sanitization is A Good Thing, and you should think about it, and this keyboard offers great sanitization for URLs. (But you probably knew that from the name.)
UIKeyboardTypeEmailAddress
If an email address and the UIKeyboardTypeURL somehow got together, the UIKeyboardTypeEmailAddress would be the love child from that unholy union:
email alphabet keyboard layout email number and punctuation keyboard layout email number and symbol keyboard layout
This has exactly the same layout as UIKeyboardTypeURL, but has a few keys swapped around to suit email addresses. The only surprise here is the “space” key; evidently spaces are allowed in email addresses, but you have to quote them. Who know? Otherwise, nothing to see here. Move along.
UIKeyboardTypeNumberPad
Here’s where things start to shake up a little bit. Behold our first number pad keyboard:
numberpad keyboard
As you can see, this layout is quite different from the others. The most important difference, though, lies in this keyboard’s lack of a Done key. The Done key is the key you use to dismiss the keyboard when you’re done editing, so knowing its location is kind of important. (Without a Done key, there’s no way for the user to dismiss the keyboard, so it just sits there.) This is one of the few places where Apple has violated the “Principle of Least Surprise” by not putting the Done key in the same place it appears on other keyboards. On “doneless” keyboards like these, most developers put a Done key on the navigation bar at the top, as I did:
numberpad done key example
As I’m sure you surmised from the title, this keyboard is specifically for numbers-only input, which is perhaps less useful than you might expect. That’s why UIKeyboardTypeNumberPad brought some friends along.
UIKeyboardTypePhonePad
This keyboard is just an on-screen implementation of a conventional touch-tone phone pad. You’ll have to use the same Done key trick from above.
phone pad number layout phone pad symbol layout
This keyboard brings along the symbol characters you need for some phone numbers, which is important. Unfortunately, however, I’ve now officially run out of witty transitions. So it’s a good thing you won’t remember, because these are not the droids you’re looking for. :: waves hand ::
UIKeyboardTypeNamePhonePad
Ah, UIKeyboardTypeNamePhonePad. Of all the many, many keyboards the iPhone supports, I find this one the most confusing. It supports numbers, letters, and spaces only, with no punctuation or symbols whatsoever. (And lowercase letters only at that because the shift key is disabled!) Very strange:
name phone pad alphabet layout name phone pad numbers layout
But mine is not to question why. Mine is just… no, actually mine is to question why. WTF Apple? Seriously, I can’t even get uppercase letters on this keyboard? Odd. There is one bit of good news about this particular keyboard, though: it has both a number pad and a Done button, so you can have a number pad without having to do a bunch of navigation-bar-done-button gymnastics. At least as long as you don’t mind using a kind of gimpy keyboard, anyway.
Keyboard App Source Code
Attached to this post you’ll find a file called “iPhone Keyboard App.src.zip”. Inside you’ll find all the NIBs, source code, graphic resources, etc. for the iPhone app I used to build this post. I made it pretty quick, but I think it’s pretty clean, so hopefully it’ll be useful to someone somewhere. At the very least it should serve as a good example of how to work with the Done key on the physical keyboard via UITextFieldDelegate and textFieldShouldReturn: versus on the Navigation bar using self.navigationItem.rightBarButtonItem and UIBarButtonItem. If anyone really wants to see it, I’d be happy to write a post about the architecture of the program and how it works at a high level.
Underview
And that’s that! You’re now an expert on iPhone keyboards. Or at least what they look like. Hopefully this will help people understand the core iPhone input method better and plan around what keyboard is best to use. Remember, the most restrictive keyboard you can use is the one you should use.

How To Easily Share Files Between Mac & Windows Computers

File sharing between Macs and Windows is a little lob-sided. Out of the box, Macs can detect any Windows computer connected to the local network. It appears right on the Finder’s sidebar. So naturally, it is very easy for a Windows user to share their files with anyone on a Mac. The reverse process – allowing a Mac to share its files – requires a little more attention. The transition from Tiger to Leopard has made it a little bit more complicated for regular users to set up shared folders because the setting has been “disguised”.
In this week’s Macnifying OS X, I’m going to show you how easy it is to share files on your Mac so that it appears on Windows computers automatically.
how to share files between mac and pc


In System Preferences, go to ‘Sharing’ and check the box for ‘File Sharing’. By default, only your Public Folder will be shared. If you want to add other folders to the shared list, click on the ‘+’ sign under the Shared Folder box and choose the folders you wish to share.
After you’re done selecting, you’ll need to set the Permissions for each shared folder. Generally, you should allow Read Only rights to avoid others from messing around with your files. As you can see from the screenshot below, I removed the group labelled ‘Users’ from the users list so only ‘Everyone’ and I appear on the list. I do this to make things easier, only to allow guests logins from other computers.
share files between computers
Next, click on ‘Options’ and on the resulting window, check the box that says “Share files and folders using SMB” and hit ‘Done’.
share files mac windows
Now, you’ll need to add your Mac into a Microsoft workgroup. To do this, click ‘Show All’ at the top of the System Preferences windows and click on ‘Network’. Select your active connection and click ‘Advanced’.

In the window which pops up, click on the ‘WINS’ tab and enter a workgroup in the appropriate field. Microsoft has two workgroups: MSHOME and WORKGROUP. Find out which workgroup the majority of your Windows computers belong to and set the workgroup to that.
Click on ‘OK’ and you’ll return to Network preferences, now hit ‘Apply’. Now you’re halfway there – the rest of the work is performed on the Windows machines.

On your Windows desktop, right-click on ‘My Computer’ and select Properties. Click on the ‘Computer Name’ tab and make sure that your workgroup is the same as the one set on your Mac. If it isn’t then click on ‘Change’, set it and restart your computer.
Once that is done, double-click on ‘My Network Places’ and voila, all of your Mac’s shared folders should be visible. Take note that the Drop Box in your Mac’s Public folder won’t be accessible. If you want to use the Drop Box to let other users “drop” their files onto your Mac, you’ll need to change its permissions.
On your Mac’s Home folder, double-click the Public folder. Right-click on Drop Box and choose ‘Get Info’. Click on the lock icon on the bottom right hand corner of the Info window and enter your account password. Then set the permission for Everyone to Read & Write hence, allowing anyone to conveniently “drop” files onto your Mac.

Did you find this tutorial easy to follow? Did it work for you? Is there an easier way to share files between Mac and Windows computers?

iphone/ipad force shutdown

iPhone 3G Force Shut-Down


I’ve had my iPhone 3G for a bit over 2 weeks now and am loving it!
But it is a bit glitchy at locking up (especially when the battery is low or you disconnect during a sync with iTunes)
If some does happen (such as the unlock screen not accepting your keystrokes to unlock it and you can’t for some reason power off just by holding the top button for a few seconds) then you either have to drain the battery
- lengthy and not great if as me you may have to do something such as get on a plane!
Or much more handily, use the force power down – like on any computer, iPod etc.
(The image shows a key being pressed, however this digit isn’t being recognised by the phone – this is when you may need to force quit)

What you do is press and hold the top right button (for locking/unlocking) and also the big button at the bottom of the screen – hold them down for between 5 – 10 seconds, and your phone will just switch off
Turn as normal and it should work!