Android Debug Bridge (henceforth adb) is a tool that allows us to run command line actions to interact with a connected Android device. With this tool you can run adb commands from the command prompt. There are many things that you can do with this handy tool. But for now, we are just going to learn how to install ADB to the command prompt in Windows. Without this installation, you would have to browse to "sdkplatform-tools" folder manually to locate adb.exe and use it via the command prompt. If you try to run it without doing this, you will get an error message like:
The first thing that you should have downloaded and extracted is the Android SDK Bundle. This bundle includes almost all the necessary tools to develop Android applications. The other thing that you must have downloaded is Java SE bundle. Android requires Java Development Kit (JDK) and Java Runtime Environment (JRE), and this bundle seems to have both. Learn how to install Android System Development Kit with Java SE in detail.
Now, that everything is prepared, navigate to the folder where you extracted Android Developer Tools bundle. The folder, has a default name that goes something like adt-bundle-windows-x86_64-20131030. The name may be different if your OS version and released date is different. This is a package file that you can directly use after extraction. No installation is required. After locating this folder, navigate to sdkplatform-tools. There you will find adb.exe.
Follow these steps now:
'adb' is not recognized as an internal or external command, operable program or batch file.The first thing that you should have downloaded and extracted is the Android SDK Bundle. This bundle includes almost all the necessary tools to develop Android applications. The other thing that you must have downloaded is Java SE bundle. Android requires Java Development Kit (JDK) and Java Runtime Environment (JRE), and this bundle seems to have both. Learn how to install Android System Development Kit with Java SE in detail.
Now, that everything is prepared, navigate to the folder where you extracted Android Developer Tools bundle. The folder, has a default name that goes something like adt-bundle-windows-x86_64-20131030. The name may be different if your OS version and released date is different. This is a package file that you can directly use after extraction. No installation is required. After locating this folder, navigate to sdkplatform-tools. There you will find adb.exe.
Follow these steps now:
- Find the entire path to adb.exe. Something like: C:\Users\USERNAME\AppData\Local\Android\sdk\platform-tools
- Left click on start, right click on "Computer" and then left click on "Properties".

- Then click on "Advanced System Settings" in the Window that opens.

- From the advanced tab, click on "Environment Variables".

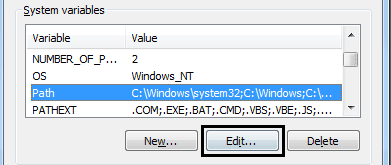
- Locate a "Variable" called "Path" under "System Variables". Click on it and then hit on "Edit".

- There will already be a "Variable value". Append the full path to adb to it. Remember to add a semi-colon (;) to the beginning of your value.
My Variable value is:

- Hit on OK and then OK again in the next screen as well to save the changes that you made.

No comments:
Post a Comment